筆記本 API
筆記本 API 允許 Visual Studio Code 擴充功能將檔案作為筆記本開啟、執行筆記本程式碼儲存格,並以多種豐富且互動式的格式渲染筆記本輸出。您可能熟悉如 Jupyter Notebook 或 Google Colab 等熱門筆記本介面 – 筆記本 API 讓您在 Visual Studio Code 內也能獲得類似的體驗。
筆記本的組成部分
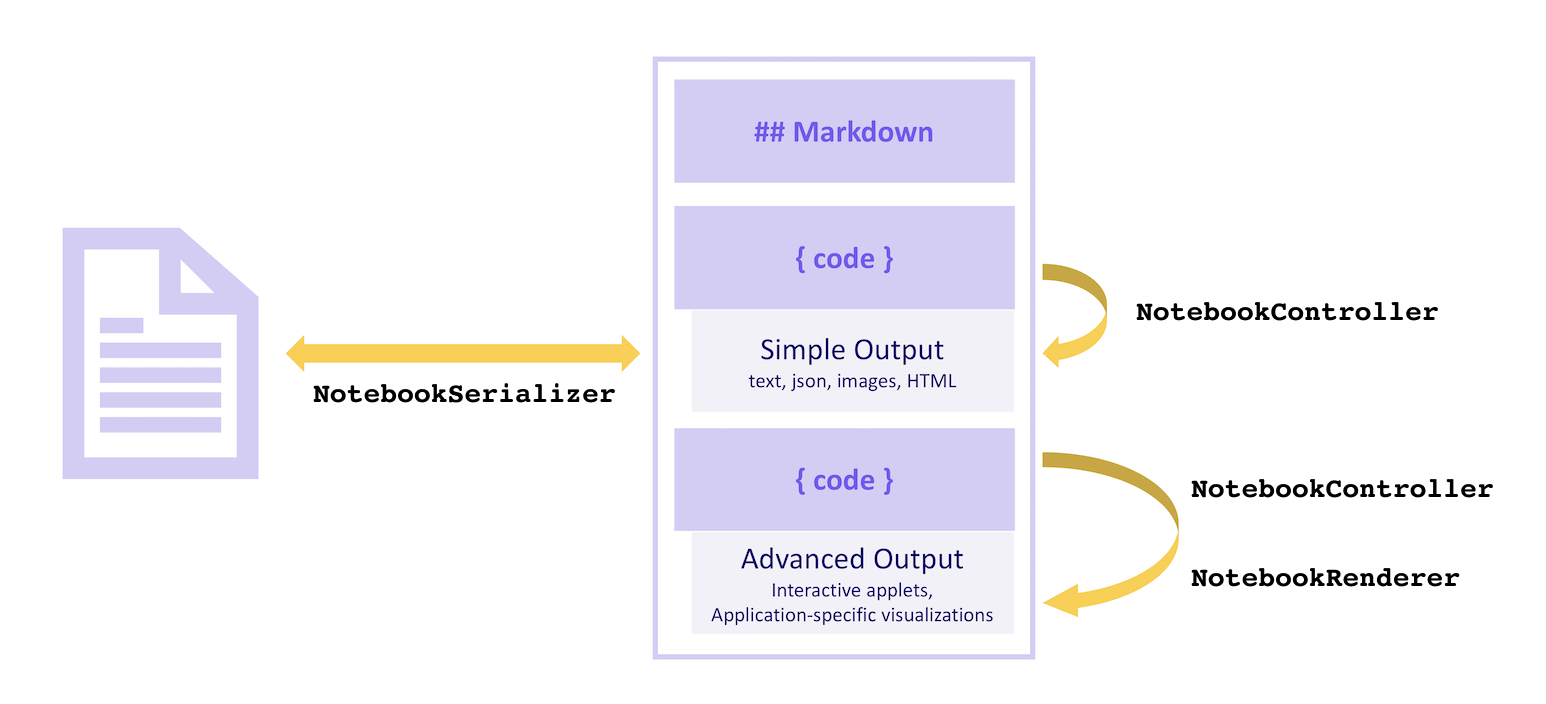
筆記本由一系列的儲存格及其輸出組成。筆記本的儲存格可以是 Markdown 儲存格或 程式碼儲存格,並在 VS Code 核心中渲染。輸出可以是各種格式。某些輸出格式,例如純文字、JSON、圖片和 HTML,由 VS Code 核心渲染。其他格式,例如應用程式特定的資料或互動式小程式,則由擴充功能渲染。
筆記本中的儲存格由 NotebookSerializer 讀取和寫入檔案系統,它負責從檔案系統讀取資料並將其轉換為儲存格的描述,以及將對筆記本的修改持久化回檔案系統。筆記本的 程式碼儲存格 可以由 NotebookController 執行,它接收儲存格的內容,並從中產生零個或多個輸出,格式多樣,從純文字到格式化文件或互動式小程式。應用程式特定的輸出格式和互動式小程式輸出由 NotebookRenderer 渲染。
視覺化
序列化程式
NotebookSerializer 負責接收筆記本的序列化位元組,並將這些位元組反序列化為 NotebookData,其中包含 Markdown 和程式碼儲存格的列表。它也負責相反的轉換:接收 NotebookData 並將資料轉換為要儲存的序列化位元組。
範例
- JSON 筆記本序列化程式:簡單的筆記本範例,它接收 JSON 輸入,並在自訂的
NotebookRenderer中輸出美化後的 JSON。 - Markdown 序列化程式:將 Markdown 檔案作為筆記本開啟和編輯。
範例
在此範例中,我們建置一個簡化的筆記本提供者擴充功能,用於檢視 Jupyter Notebook 格式的檔案,副檔名為 .notebook(而不是其傳統的檔案副檔名 .ipynb)。
筆記本序列化程式在 package.json 的 contributes.notebooks 區段中宣告如下
{
    ...
    "contributes": {
        ...
        "notebooks": [
            {
                "type": "my-notebook",
                "displayName": "My Notebook",
                "selector": [
                    {
                        "filenamePattern": "*.notebook"
                    }
                ]
            }
        ]
    }
}
然後,筆記本序列化程式在擴充功能的啟用事件中註冊
import { TextDecoder, TextEncoder } from 'util';
import * as vscode from 'vscode';

export function activate(context: vscode.ExtensionContext) {
  context.subscriptions.push(
    vscode.workspace.registerNotebookSerializer('my-notebook', new SampleSerializer())
  );
}

interface RawNotebook {
  cells: RawNotebookCell[];
}

interface RawNotebookCell {
  source: string[];
  cell_type: 'code' | 'markdown';
}

class SampleSerializer implements vscode.NotebookSerializer {
  async deserializeNotebook(
    content: Uint8Array,
    _token: vscode.CancellationToken
  ): Promise<vscode.NotebookData> {
    var contents = new TextDecoder().decode(content);

    let raw: RawNotebookCell[];
    try {
      raw = (<RawNotebook>JSON.parse(contents)).cells;
    } catch {
      raw = [];
    }

    const cells = raw.map(
      item =>
        new vscode.NotebookCellData(
          item.cell_type === 'code'
            ? vscode.NotebookCellKind.Code
            : vscode.NotebookCellKind.Markup,
          item.source.join('\n'),
          item.cell_type === 'code' ? 'python' : 'markdown'
        )
    );

    return new vscode.NotebookData(cells);
  }

  async serializeNotebook(
    data: vscode.NotebookData,
    _token: vscode.CancellationToken
  ): Promise<Uint8Array> {
    let contents: RawNotebookCell[] = [];

    for (const cell of data.cells) {
      contents.push({
        cell_type: cell.kind === vscode.NotebookCellKind.Code ? 'code' : 'markdown',
        source: cell.value.split(/\r?\n/g)
      });
    }

    return new TextEncoder().encode(JSON.stringify(contents));
  }
}
現在嘗試執行您的擴充功能並開啟以 .notebook 副檔名儲存的 Jupyter Notebook 格式檔案

您應該能夠開啟 Jupyter 格式的筆記本,並將其儲存格檢視為純文字和渲染後的 Markdown,以及編輯儲存格。但是,輸出將不會持久化到磁碟;若要儲存輸出,您還需要序列化和反序列化來自 NotebookData 的儲存格輸出。
若要執行儲存格,您需要實作 NotebookController。
控制器
NotebookController 負責接收程式碼儲存格並執行程式碼以產生一些或不產生任何輸出。
控制器透過在建立控制器時設定 NotebookController#notebookType 屬性,直接與筆記本序列化程式和筆記本類型關聯。然後,透過在擴充功能啟用時將控制器推送至擴充功能訂閱,控制器會在全域註冊。
export function activate(context: vscode.ExtensionContext) {
  context.subscriptions.push(new Controller());
}

class Controller {
  readonly controllerId = 'my-notebook-controller-id';
  readonly notebookType = 'my-notebook';
  readonly label = 'My Notebook';
  readonly supportedLanguages = ['python'];

  private readonly _controller: vscode.NotebookController;
  private _executionOrder = 0;

  constructor() {
    this._controller = vscode.notebooks.createNotebookController(
      this.controllerId,
      this.notebookType,
      this.label
    );

    this._controller.supportedLanguages = this.supportedLanguages;
    this._controller.supportsExecutionOrder = true;
    this._controller.executeHandler = this._execute.bind(this);
  }

  private _execute(
    cells: vscode.NotebookCell[],
    _notebook: vscode.NotebookDocument,
    _controller: vscode.NotebookController
  ): void {
    for (let cell of cells) {
      this._doExecution(cell);
    }
  }

  private async _doExecution(cell: vscode.NotebookCell): Promise<void> {
    const execution = this._controller.createNotebookCellExecution(cell);
    execution.executionOrder = ++this._executionOrder;
    execution.start(Date.now()); // Keep track of elapsed time to execute cell.

    /* Do some execution here; not implemented */

    execution.replaceOutput([
      new vscode.NotebookCellOutput([
        vscode.NotebookCellOutputItem.text('Dummy output text!')
      ])
    ]);
    execution.end(true, Date.now());
  }
}
如果您要將提供 NotebookController 的擴充功能與其序列化程式分開發佈,則在 package.json 的 keywords 中新增類似 notebookKernel<ViewTypeUpperCamelCased> 的條目。例如,如果您為 github-issues 筆記本類型發佈了替代核心,則應在您的擴充功能中新增 notebookKernelGithubIssues 關鍵字。這可以改善從 Visual Studio Code 內開啟 <ViewTypeUpperCamelCased> 類型筆記本時,擴充功能的可探索性。
範例
- GitHub Issues 筆記本:用於執行 GitHub Issues 查詢的控制器
- REST Book:用於執行 REST 查詢的控制器。
- Regexper 筆記本:用於視覺化正規表示式的控制器。
輸出類型
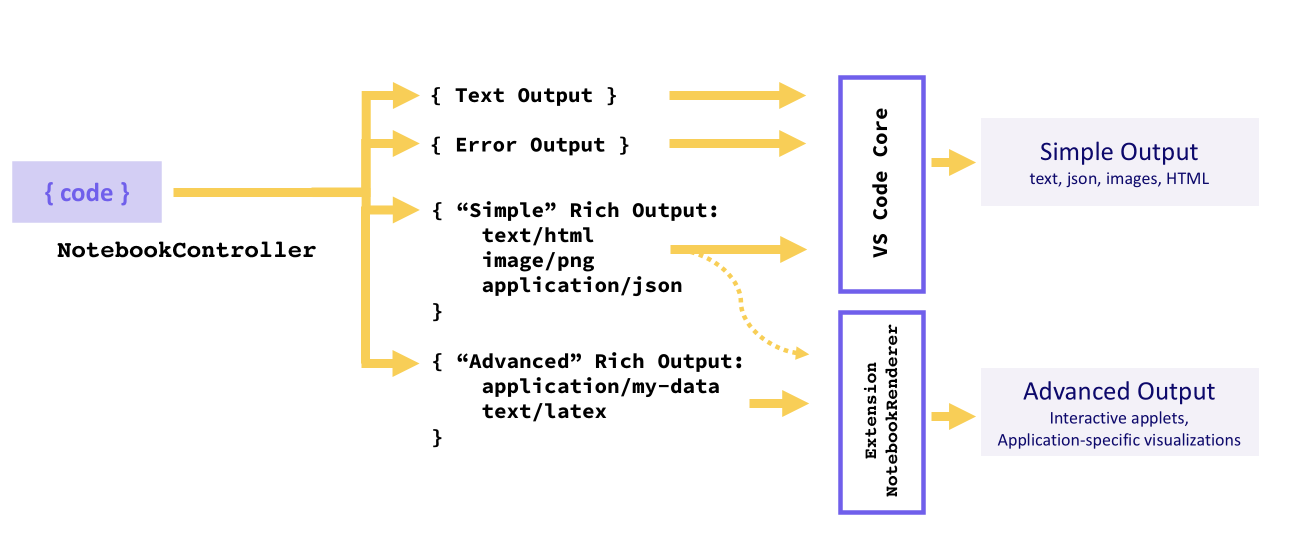
輸出必須是三種格式之一:文字輸出、錯誤輸出或豐富輸出。核心可以為單次儲存格執行提供多個輸出,在這種情況下,它們將顯示為列表。
簡單的格式,例如文字輸出、錯誤輸出或「簡單」變體的豐富輸出(HTML、Markdown、JSON 等)由 VS Code 核心渲染,而應用程式特定的豐富輸出類型則由 NotebookRenderer 渲染。擴充功能可以選擇自行渲染「簡單」的豐富輸出,例如為 Markdown 輸出新增 LaTeX 支援。
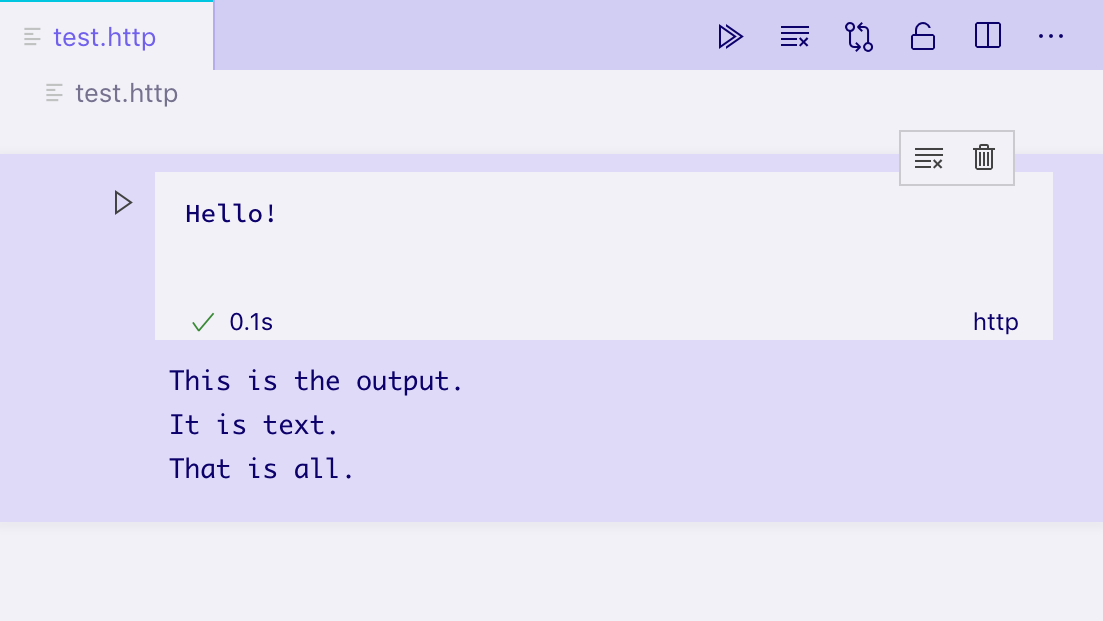
文字輸出
文字輸出是最簡單的輸出格式,其運作方式與您可能熟悉的許多 REPL 類似。它們僅包含一個 text 欄位,該欄位在儲存格的輸出元素中渲染為純文字
vscode.NotebookCellOutputItem.text('This is the output...');
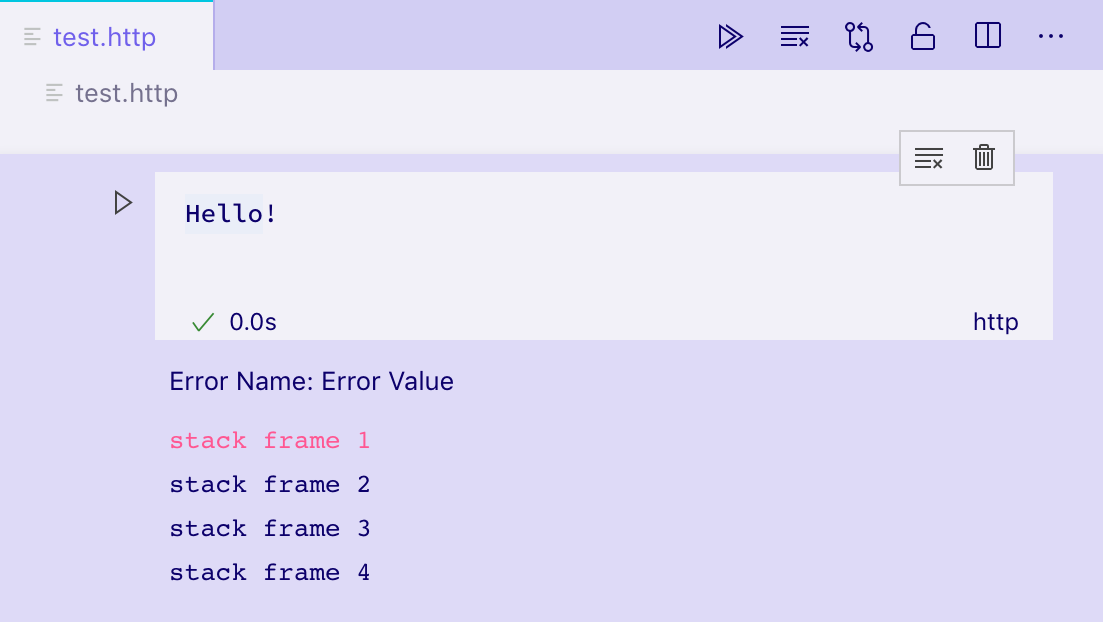
錯誤輸出
錯誤輸出有助於以一致且易於理解的方式顯示執行階段錯誤。它們支援標準的 Error 物件。
try {
  /* Some code */
} catch (error) {
  vscode.NotebookCellOutputItem.error(error);
}
豐富輸出
豐富輸出是顯示儲存格輸出最進階的形式。它們允許提供輸出資料的許多不同表示形式,並以 mimetype 作為鍵值。例如,如果儲存格輸出要表示 GitHub Issue,則核心可能會產生一個豐富輸出,其 data 欄位上具有多個屬性
- 包含 Issue 格式化檢視的
text/html欄位。 - 包含機器可讀檢視的
text/x-json欄位。 - 一個
application/github-issue欄位,NotebookRenderer可以使用它來建立 Issue 的完整互動式檢視。
在這種情況下,text/html 和 text/x-json 檢視將由 VS Code 原生渲染,但如果沒有 NotebookRenderer 註冊到該 mimetype,則 application/github-issue 檢視將顯示錯誤。
execution.replaceOutput([new vscode.NotebookCellOutput([
                            vscode.NotebookCellOutputItem.text('<b>Hello</b> World', 'text/html'),
                            vscode.NotebookCellOutputItem.json({ hello: 'world' }),
                            vscode.NotebookCellOutputItem.json({ custom-data-for-custom-renderer: 'data' }, 'application/custom'),
                        ])]);
預設情況下,VS Code 可以渲染以下 mimetype
- application/javascript
- text/html
- image/svg+xml
- text/markdown
- image/png
- image/jpeg
- text/plain
VS Code 將在內建編輯器中將這些 mimetype 渲染為程式碼
- text/x-json
- text/x-javascript
- text/x-html
- text/x-rust
- ... 任何其他內建或已安裝語言的 text/x-LANGUAGE_ID。
此筆記本正在使用內建編輯器來顯示一些 Rust 程式碼: 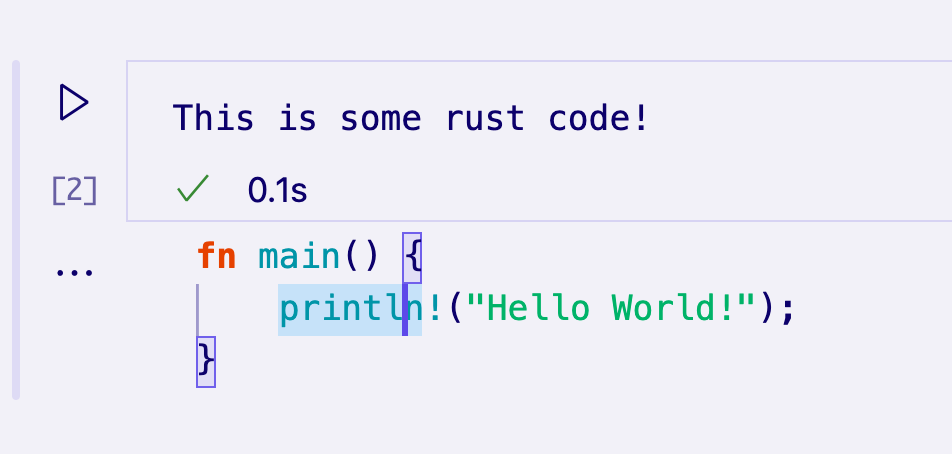
若要渲染替代的 mimetype,必須為該 mimetype 註冊 NotebookRenderer。
筆記本渲染器
筆記本渲染器負責接收特定 mimetype 的輸出資料,並提供該資料的渲染檢視。輸出儲存格共用的渲染器可以在這些儲存格之間維護全域狀態。渲染檢視的複雜性範圍可以從簡單的靜態 HTML 到動態的完全互動式小程式。在本節中,我們將探討渲染代表 GitHub Issue 的輸出的各種技術。
您可以使用我們的 Yeoman 產生器的樣板快速開始。若要執行此操作,請先使用以下命令安裝 Yeoman 和 VS Code Generators
npm install -g yo generator-code
然後,執行 yo code 並選擇 New Notebook Renderer (TypeScript)。
如果您不使用此範本,您只需要確保將 notebookRenderer 新增到擴充功能 package.json 中的 keywords,並在擴充功能名稱或描述中的某處提及其 mimetype,以便使用者可以找到您的渲染器。
簡單、非互動式渲染器
渲染器是透過貢獻擴充功能 package.json 的 contributes.notebookRenderer 屬性來宣告一組 mimetype。此渲染器將適用於 ms-vscode.github-issue-notebook/github-issue 格式的輸入,我們假設某些已安裝的控制器能夠提供
{
  "activationEvents": ["...."],
  "contributes": {
    ...
    "notebookRenderer": [
      {
        "id": "github-issue-renderer",
        "displayName": "GitHub Issue Renderer",
        "entrypoint": "./out/renderer.js",
        "mimeTypes": [
          "ms-vscode.github-issue-notebook/github-issue"
        ]
      }
    ]
  }
}
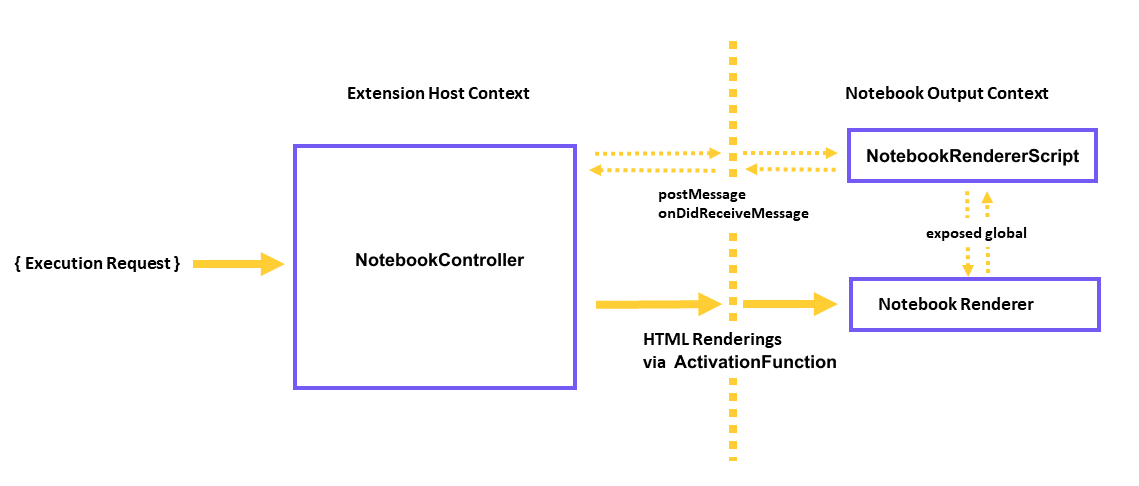
輸出渲染器始終在單個 iframe 中渲染,與 VS Code UI 的其餘部分分開,以確保它們不會意外干擾或導致 VS Code 速度變慢。貢獻指的是「進入點」腳本,該腳本會在任何輸出需要渲染之前立即載入到筆記本的 iframe 中。您的進入點需要是單個檔案,您可以自行編寫,或使用 Webpack、Rollup 或 Parcel 等捆綁器來建立。
載入後,您的進入點腳本應從 vscode-notebook-renderer 匯出 ActivationFunction,以便在 VS Code 準備好渲染您的渲染器後渲染您的 UI。例如,這會將您的所有 GitHub issue 資料作為 JSON 放入儲存格輸出中
import type { ActivationFunction } from 'vscode-notebook-renderer';

export const activate: ActivationFunction = context => ({
  renderOutputItem(data, element) {
    element.innerText = JSON.stringify(data.json());
  }
});
您可以在此處參考完整的 API 定義。如果您使用的是 TypeScript,您可以安裝 @types/vscode-notebook-renderer,然後將 vscode-notebook-renderer 新增到 tsconfig.json 中的 types 陣列,以使這些類型在您的程式碼中可用。
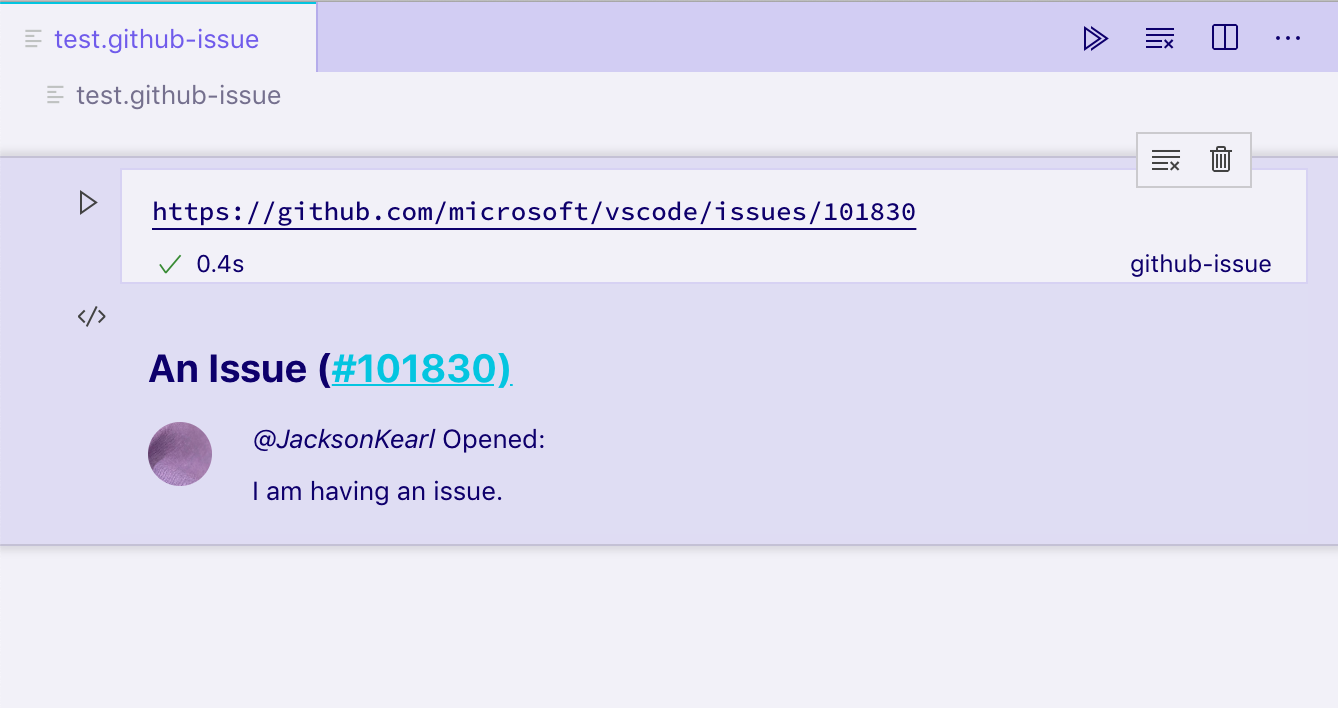
若要建立更豐富的內容,您可以手動建立 DOM 元素,或使用 Preact 等框架並將其渲染到輸出元素中,例如
import type { ActivationFunction } from 'vscode-notebook-renderer';
import { h, render } from 'preact';

const Issue: FunctionComponent<{ issue: GithubIssue }> = ({ issue }) => (
  <div key={issue.number}>
    <h2>
      {issue.title}
      (<a href={`https://github.com/${issue.repo}/issues/${issue.number}`}>#{issue.number}</a>)
    </h2>
    <img src={issue.user.avatar_url} style={{ float: 'left', width: 32, borderRadius: '50%', marginRight: 20 }} />
    <i>@{issue.user.login}</i> Opened: <div style="margin-top: 10px">{issue.body}</div>
  </div>
);

const GithubIssues: FunctionComponent<{ issues: GithubIssue[]; }> = ({ issues }) => (
  <div>{issues.map(issue => <Issue key={issue.number} issue={issue} />)}</div>
);

export const activate: ActivationFunction = (context) => ({
    renderOutputItem(data, element) {
        render(<GithubIssues issues={data.json()} />, element);
    }
});
在具有 ms-vscode.github-issue-notebook/github-issue 資料欄位的輸出儲存格上執行此渲染器,會為我們提供以下靜態 HTML 檢視
如果您的容器外部有元素或其他非同步程序,您可以使用 disposeOutputItem 將它們拆除。當輸出被清除、儲存格被刪除以及在為現有儲存格渲染新輸出之前,將會觸發此事件。例如
const intervals = new Map();

export const activate: ActivationFunction = (context) => ({
    renderOutputItem(data, element) {
        render(<GithubIssues issues={data.json()} />, element);

        intervals.set(data.mime, setInterval(() => {
            if(element.querySelector('h2')) {
                element.querySelector('h2')!.style.color = `hsl(${Math.random() * 360}, 100%, 50%)`;
            }
        }, 1000));
    },
    disposeOutputItem(id) {
        clearInterval(intervals.get(id));
        intervals.delete(id);
    }
});
請務必記住,筆記本的所有輸出都在同一個 iframe 中的不同元素中渲染。如果您使用 document.querySelector 等函式,請確保將其範圍限定為您感興趣的特定輸出,以避免與其他輸出衝突。在此範例中,我們使用 element.querySelector 來避免該問題。
互動式筆記本(與控制器通訊)
想像一下,我們想要新增在點擊渲染輸出中的按鈕後檢視 Issue 評論的功能。假設控制器可以提供 mimetype 為 ms-vscode.github-issue-notebook/github-issue-with-comments 的包含評論的 Issue 資料,我們可以嘗試預先擷取所有評論並按如下方式實作
const Issue: FunctionComponent<{ issue: GithubIssueWithComments }> = ({ issue }) => {
  const [showComments, setShowComments] = useState(false);

  return (
    <div key={issue.number}>
      <h2>
        {issue.title}
        (<a href={`https://github.com/${issue.repo}/issues/${issue.number}`}>#{issue.number}</a>)
      </h2>
      <img src={issue.user.avatar_url} style={{ float: 'left', width: 32, borderRadius: '50%', marginRight: 20 }} />
      <i>@{issue.user.login}</i> Opened: <div style="margin-top: 10px">{issue.body}</div>
      <button onClick={() => setShowComments(true)}>Show Comments</button>
      {showComments && issue.comments.map(comment => <div>{comment.text}</div>)}
    </div>
  );
};
這立即引起了一些警訊。首先,我們正在載入所有 Issue 的完整評論資料,即使在我們點擊按鈕之前。此外,即使我們只想顯示更多資料,我們也需要控制器支援完全不同的 mimetype。
相反地,控制器可以透過包含一個預先載入腳本來為渲染器提供額外功能,VS Code 也會將該腳本載入到 iframe 中。此腳本有權存取全域函式 postKernelMessage 和 onDidReceiveKernelMessage,可用於與控制器通訊。
例如,您可以修改控制器 rendererScripts 以參考一個新檔案,您可以在其中建立與擴充功能主機的回連,並公開一個全域通訊腳本供渲染器使用。
在您的控制器中
class Controller {
  // ...

  readonly rendererScriptId = 'my-renderer-script';

  constructor() {
    // ...

    this._controller.rendererScripts.push(
      new vscode.NotebookRendererScript(
        vscode.Uri.file(/* path to script */),
        rendererScriptId
      )
    );
  }
}
在您的 package.json 中,將您的腳本指定為渲染器的相依性
{
  "activationEvents": ["...."],
  "contributes": {
    ...
    "notebookRenderer": [
      {
        "id": "github-issue-renderer",
        "displayName": "GitHub Issue Renderer",
        "entrypoint": "./out/renderer.js",
        "mimeTypes": [...],
        "dependencies": [
            "my-renderer-script"
        ]
      }
    ]
  }
}
在您的腳本檔案中,您可以宣告通訊函式以與控制器通訊
import 'vscode-notebook-renderer/preload';

globalThis.githubIssueCommentProvider = {
  loadComments(issueId: string, callback: (comments: GithubComment[]) => void) {
    postKernelMessage({ command: 'comments', issueId });

    onDidReceiveKernelMessage(event => {
      if (event.data.type === 'comments' && event.data.issueId === issueId) {
        callback(event.data.comments);
      }
    });
  }
};
然後您可以在渲染器中使用它。您需要確保檢查控制器渲染腳本公開的全域是否可用,因為其他開發人員可能會在其他筆記本和未實作 githubIssueCommentProvider 的控制器中建立 github issue 輸出。在這種情況下,我們只會在全域可用的情況下顯示 **載入評論** 按鈕
const canLoadComments = globalThis.githubIssueCommentProvider !== undefined;
const Issue: FunctionComponent<{ issue: GithubIssue }> = ({ issue }) => {
  const [comments, setComments] = useState([]);
  const loadComments = () =>
    globalThis.githubIssueCommentProvider.loadComments(issue.id, setComments);

  return (
    <div key={issue.number}>
      <h2>
        {issue.title}
        (<a href={`https://github.com/${issue.repo}/issues/${issue.number}`}>#{issue.number}</a>)
      </h2>
      <img src={issue.user.avatar_url} style={{ float: 'left', width: 32, borderRadius: '50%', marginRight: 20 }} />
      <i>@{issue.user.login}</i> Opened: <div style="margin-top: 10px">{issue.body}</div>
      {canLoadComments && <button onClick={loadComments}>Load Comments</button>}
      {comments.map(comment => <div>{comment.text}</div>)}
    </div>
  );
};
最後,我們想要設定與控制器的通訊。當渲染器使用全域 postKernelMessage 函式發佈訊息時,會呼叫 NotebookController.onDidReceiveMessage 方法。若要實作此方法,請附加到 onDidReceiveMessage 以監聽訊息
class Controller {
  // ...

  constructor() {
    // ...

    this._controller.onDidReceiveMessage(event => {
      if (event.message.command === 'comments') {
        _getCommentsForIssue(event.message.issueId).then(
          comments =>
            this._controller.postMessage({
              type: 'comments',
              issueId: event.message.issueId,
              comments
            }),
          event.editor
        );
      }
    });
  }
}
互動式筆記本(與擴充功能主機通訊)
想像一下,我們想要新增在獨立編輯器中開啟輸出項目的功能。為了實現這一點,渲染器需要能夠向擴充功能主機發送訊息,然後擴充功能主機將啟動編輯器。
這在渲染器和控制器是兩個獨立擴充功能的情況下很有用。
在渲染器擴充功能的 package.json 中,將 requiresMessaging 的值指定為 optional,這允許您的渲染器在它可以存取和無法存取擴充功能主機的兩種情況下都能運作。
{
  "activationEvents": ["...."],
  "contributes": {
    ...
    "notebookRenderer": [
      {
        "id": "output-editor-renderer",
        "displayName": "Output Editor Renderer",
        "entrypoint": "./out/renderer.js",
        "mimeTypes": [...],
        "requiresMessaging": "optional"
      }
    ]
  }
}
requiresMessaging 的可能值包括
always:需要訊息傳遞。渲染器僅在它是可以在擴充功能主機中執行的擴充功能的一部分時使用。optional:當擴充功能主機可用時,渲染器使用訊息傳遞會更好,但安裝和執行渲染器並非必要。never:渲染器不需要訊息傳遞。
最後兩個選項是首選,因為這確保了渲染器擴充功能在其他擴充功能主機可能不一定可用的環境中的可攜性。
渲染器腳本檔案可以按如下方式設定通訊
import { ActivationFunction } from 'vscode-notebook-renderer';

export const activate: ActivationFunction = (context) => ({
  renderOutputItem(data, element) {
    // Render the output using the output `data`
    ....
    // The availability of messaging depends on the value in `requiresMessaging`
    if (!context.postMessage){
      return;
    }

    // Upon some user action in the output (such as clicking a button),
    // send a message to the extension host requesting the launch of the editor.
    document.querySelector('#openEditor').addEventListener('click', () => {
      context.postMessage({
        request: 'showEditor',
        data: '<custom data>'
      })
    });
  }
});
然後您可以在擴充功能主機中按如下方式使用該訊息
const messageChannel = notebooks.createRendererMessaging('output-editor-renderer');
messageChannel.onDidReceiveMessage(e => {
  if (e.message.request === 'showEditor') {
    // Launch the editor for the output identified by `e.message.data`
  }
});
注意
- 為確保您的擴充功能在傳遞訊息之前在擴充功能主機中執行,請將
onRenderer:<your renderer id>新增到您的activationEvents,並在您的擴充功能的activate函式中設定通訊。 - 並非渲染器擴充功能發送到擴充功能主機的所有訊息都保證會傳遞。使用者可能會在渲染器的訊息傳遞之前關閉筆記本。
支援除錯
對於某些控制器,例如實作程式語言的控制器,允許除錯儲存格的執行可能很理想。若要新增除錯支援,筆記本核心可以實作除錯配接器,方法是直接實作除錯配接器協定 (DAP),或是委派並將協定轉換為現有的筆記本除錯工具(如 'vscode-simple-jupyter-notebook' 範例中所做的那樣)。更簡單的方法是使用現有的未修改除錯擴充功能,並即時轉換 DAP 以滿足筆記本的需求(如 'vscode-nodebook' 中所做的那樣)。
範例
- vscode-nodebook:Node.js 筆記本,除錯支援由 VS Code 的內建 JavaScript 除錯工具和一些簡單的協定轉換提供
- vscode-simple-jupyter-notebook:Jupyter 筆記本,除錯支援由現有的 Xeus 除錯工具提供