使用 WebAssembly 進行擴充功能開發
2024 年 5 月 8 日,Dirk Bäumer 撰寫
Visual Studio Code 透過 WebAssembly 執行引擎擴充功能,支援執行 WASM 二進位檔。主要的使用案例是將以 C/C++ 或 Rust 撰寫的程式編譯成 WebAssembly,然後直接在 VS Code 中執行這些程式。一個著名的例子是 Visual Studio Code for Education,它利用此支援在適用於 Web 的 VS Code 中執行 Python 解譯器。這篇部落格文章提供了關於如何實作此功能的詳細見解。
2024 年 1 月,Bytecode Alliance 推出了 WASI 0.2 預覽版。WASI 0.2 預覽版中的一項關鍵技術是元件模型。WebAssembly 元件模型透過標準化介面、資料類型和模組組合,簡化了 WebAssembly 元件及其主機環境之間的互動。這種標準化是透過使用 WIT ( WASM 介面類型) 檔案來實現的。WIT 檔案有助於描述 JavaScript/TypeScript 擴充功能 (主機) 與執行以另一種語言 (例如 Rust 或 C/C++) 編碼的計算的 WebAssembly 元件之間的互動。
這篇部落格文章概述了開發人員如何利用元件模型將 WebAssembly 程式庫整合到他們的擴充功能中。我們專注於三個使用案例:(a) 使用 WebAssembly 實作程式庫,並從 JavaScript/TypeScript 中的擴充功能程式碼呼叫它,(b) 從 WebAssembly 程式碼呼叫 VS Code API,以及 (c) 示範如何使用資源在 WebAssembly 或 TypeScript 程式碼中封裝和管理具狀態物件。
這些範例要求您已安裝最新版本的下列工具,以及 VS Code 和 NodeJS:Rust 編譯器工具鏈、wasm-tools 和 wit-bindgen。
我也要感謝來自 Fastly 的 L. Pereira 和 Luke Wagner 對本文提供的寶貴意見回饋。
Rust 中的計算機
在第一個範例中,我們示範了開發人員如何將以 Rust 撰寫的程式庫整合到 VS Code 擴充功能中。如先前所述,元件是使用 WIT 檔案描述的。在我們的範例中,程式庫執行簡單的運算,例如加法、減法、乘法和除法。對應的 WIT 檔案如下所示
package vscode:example;

interface types {
	record operands {
		left: u32,
		right: u32
	}

	variant operation {
		add(operands),
		sub(operands),
		mul(operands),
		div(operands)
	}
}
world calculator {
	use types.{ operation };

	export calc: func(o: operation) -> u32;
}
Rust 工具 wit-bindgen 用於為計算機產生 Rust 繫結。有兩種方法可以使用此工具
-
作為程序巨集,直接在實作檔案中產生繫結。此方法是標準方法,但缺點是不允許檢查產生的繫結程式碼。
-
作為 命令列工具,在磁碟上建立繫結檔案。這種方法在 VS Code 擴充功能範例儲存庫中針對以下資源範例的程式碼中示範。
使用 wit-bindgen 工具作為程序巨集的對應 Rust 檔案如下所示
// Use a procedural macro to generate bindings for the world we specified in
// `calculator.wit`
wit_bindgen::generate!({
	// the name of the world in the `*.wit` input file
	world: "calculator",
});
但是,使用命令 cargo build --target wasm32-unknown-unknown 將 Rust 檔案編譯為 WebAssembly 會導致編譯錯誤,因為缺少已匯出的 calc 函數的實作。以下是 calc 函數的簡單實作
// Use a procedural macro to generate bindings for the world we specified in
// `calculator.wit`
wit_bindgen::generate!({
	// the name of the world in the `*.wit` input file
	world: "calculator",
});

struct Calculator;

impl Guest for Calculator {

    fn calc(op: Operation) -> u32 {
		match op {
			Operation::Add(operands) => operands.left + operands.right,
			Operation::Sub(operands) => operands.left - operands.right,
			Operation::Mul(operands) => operands.left * operands.right,
			Operation::Div(operands) => operands.left / operands.right,
		}
	}
}

// Export the Calculator to the extension code.
export!(Calculator);
檔案結尾的 export!(Calculator); 陳述式會從 WebAssembly 程式碼匯出 Calculator,以允許擴充功能呼叫 API。
wit2ts 工具用於產生必要的 TypeScript 繫結,以便在 VS Code 擴充功能中與 WebAssembly 程式碼互動。此工具由 VS Code 團隊開發,以滿足 VS Code 擴充功能架構的特定需求,主要是因為
- VS Code API 僅在擴充功能主機 Worker 中可存取。從擴充功能主機 Worker 產生的任何額外 Worker 都無法存取 VS Code API,這與 NodeJS 或瀏覽器等環境形成對比,在這些環境中,每個 Worker 通常都可以存取幾乎所有執行階段 API。
- 多個擴充功能共用同一個擴充功能主機 Worker。擴充功能應避免在該 Worker 上執行任何長時間執行的同步計算。
當我們實作 VS Code 的 WASI Preview 1 時,這些架構需求就已存在。但是,我們最初的實作是手動撰寫的。預期元件模型會被更廣泛地採用,因此我們開發了一個工具來促進元件與其 VS Code 特定主機實作的整合。
命令 wit2ts --outDir ./src ./wit 會在 src 資料夾中產生 calculator.ts 檔案,其中包含 WebAssembly 程式碼的 TypeScript 繫結。使用這些繫結的簡單擴充功能看起來會像這樣
import * as vscode from 'vscode';
import { WasmContext, Memory } from '@vscode/wasm-component-model';

// Import the code generated by wit2ts
import { calculator, Types } from './calculator';

export async function activate(context: vscode.ExtensionContext): Promise<void> {
  // The channel for printing the result.
  const channel = vscode.window.createOutputChannel('Calculator');
  context.subscriptions.push(channel);

  // Load the Wasm module
  const filename = vscode.Uri.joinPath(
    context.extensionUri,
    'target',
    'wasm32-unknown-unknown',
    'debug',
    'calculator.wasm'
  );
  const bits = await vscode.workspace.fs.readFile(filename);
  const module = await WebAssembly.compile(bits);

  // The context for the WASM module
  const wasmContext: WasmContext.Default = new WasmContext.Default();

  // Instantiate the module
  const instance = await WebAssembly.instantiate(module, {});
  // Bind the WASM memory to the context
  wasmContext.initialize(new Memory.Default(instance.exports));

  // Bind the TypeScript Api
  const api = calculator._.exports.bind(
    instance.exports as calculator._.Exports,
    wasmContext
  );

  context.subscriptions.push(
    vscode.commands.registerCommand('vscode-samples.wasm-component-model.run', () => {
      channel.show();
      channel.appendLine('Running calculator example');
      const add = Types.Operation.Add({ left: 1, right: 2 });
      channel.appendLine(`Add ${api.calc(add)}`);
      const sub = Types.Operation.Sub({ left: 10, right: 8 });
      channel.appendLine(`Sub ${api.calc(sub)}`);
      const mul = Types.Operation.Mul({ left: 3, right: 7 });
      channel.appendLine(`Mul ${api.calc(mul)}`);
      const div = Types.Operation.Div({ left: 10, right: 2 });
      channel.appendLine(`Div ${api.calc(div)}`);
    })
  );
}
當您在適用於 Web 的 VS Code 中編譯並執行上述程式碼時,它會在 Calculator 通道中產生以下輸出
您可以在 VS Code 擴充功能範例儲存庫中找到此範例的完整原始碼。
深入探討 @vscode/wasm-component-model
檢查 wit2ts 工具產生的原始碼會揭示其對 @vscode/wasm-component-model npm 模組的依賴性。此模組是 VS Code 對 元件模型的標準 ABI 的實作,並從對應的 Python 程式碼中汲取靈感。雖然沒有必要理解元件模型的內部運作方式才能理解這篇部落格文章,但我們將闡明其運作原理,特別是有關如何在 JavaScript/TypeScript 和 WebAssembly 程式碼之間傳遞資料。
與其他工具 (例如 wit-bindgen 或 jco) 為 WIT 檔案產生繫結不同,wit2ts 建立了一個元模型,然後可用於在執行階段為各種使用案例產生繫結。這種彈性使我們能夠滿足 VS Code 中擴充功能開發的架構需求。透過使用這種方法,我們可以「承諾化」繫結,並允許在 Worker 中執行 WebAssembly 程式碼。我們使用此機制來實作 VS Code 的 WASI 0.2 預覽版。
您可能已經注意到,在產生繫結時,函數是使用類似 calculator._.imports.create 的名稱 (請注意底線) 參照的。為了避免與 WIT 檔案中的符號發生名稱衝突 (例如,可能有一個名為 imports 的類型定義),API 函數會放置在 _ 命名空間中。元模型本身位於 $ 命名空間中。因此,calculator.$.exports.calc 代表匯出的 calc 函數的中繼資料。
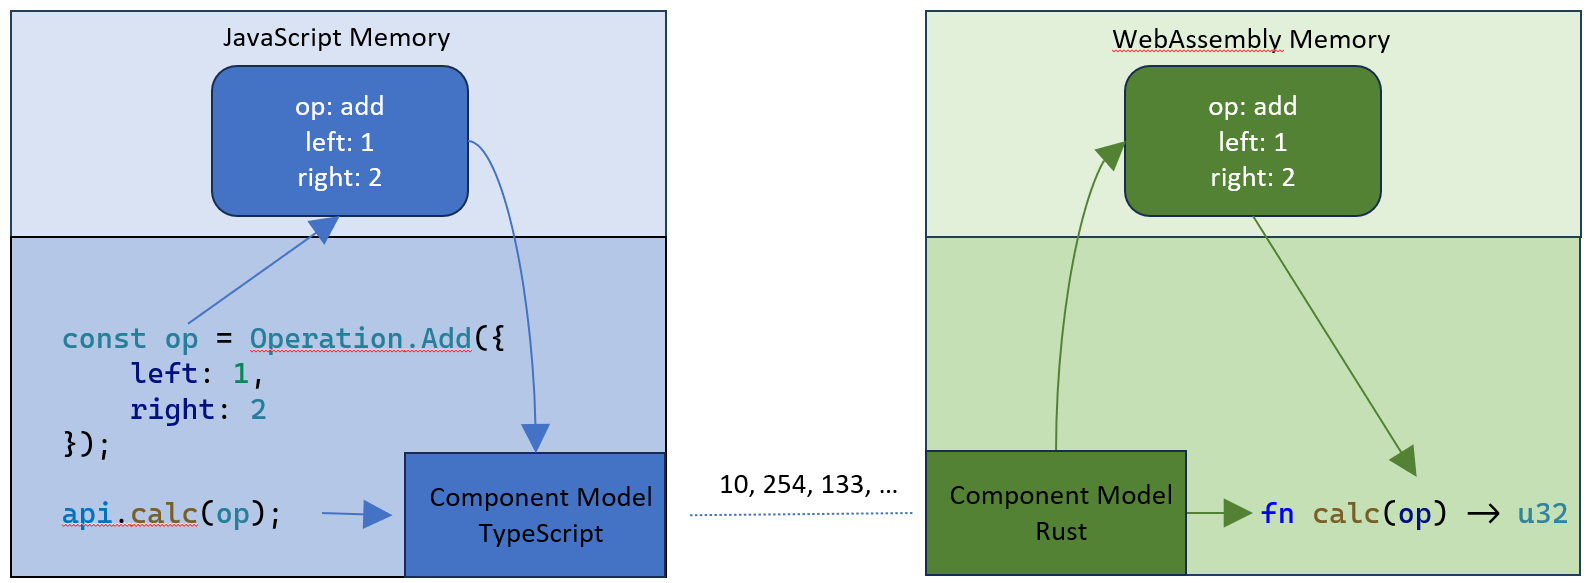
在上面的範例中,傳遞到 calc 函數中的 add 運算參數由三個欄位組成:運算碼、左值和右值。根據元件模型的標準 ABI,引數是依值傳遞的。它還概述了資料如何序列化、傳遞給 WebAssembly 函數,以及在另一端還原序列化。此過程會產生兩個運算物件:一個在 JavaScript 堆積上,另一個在線性 WebAssembly 記憶體中。下圖說明了這一點
下表列出了可用的 WIT 類型、它們在 VS Code 元件模型實作中對 JavaScript 物件的對應,以及使用的對應 TypeScript 類型。
| WIT | JavaScript | TypeScript |
|---|---|---|
| u8 | number | type u8 = number; |
| u16 | number | type u16 = number; |
| u32 | number | type u32 = number; |
| u64 | bigint | type u64 = bigint; |
| s8 | number | type s8 = number; |
| s16 | number | type s16 = number; |
| s32 | number | type s32 = number; |
| s64 | bigint | type s64 = bigint; |
| float32 | number | type float32 = number; |
| float64 | number | type float64 = number; |
| bool | boolean | boolean |
| string | string | string |
| char | string[0] | string |
| record | 物件實值 | 類型宣告 |
| list<T> | [] | Array<T> |
| tuple<T1, T2> | [] | [T1, T2] |
| enum | 字串值 | 字串列舉 |
| flags | number | bigint |
| variant | 物件實值 | 可辨識的聯集 |
| option<T> | 變數 | ? 和 (T | undefined) |
| result<ok, err> | 例外狀況或物件實值 | 例外狀況或結果類型 |
請務必注意,元件模型不支援低階 (C 樣式) 指標。因此,您無法傳遞物件圖或遞迴資料結構。在這方面,它與 JSON 有相同的限制。為了盡量減少資料複製,元件模型引入了資源的概念,我們將在本部落格文章的後續章節中更詳細地探討。
jco 專案也支援使用 type 命令為 WebAssembly 元件產生 JavaScript/TypeScript 繫結。如前所述,我們開發了自己的工具來滿足 VS Code 的特定需求。但是,我們每兩週與 jco 團隊舉行會議,以確保工具之間盡可能保持一致。一個基本要求是這兩種工具都應對 WIT 資料類型使用相同的 JavaScript 和 TypeScript 表示法。我們也在探索在這兩種工具之間共用程式碼的可能性。
從 WebAssembly 程式碼呼叫 TypeScript
WIT 檔案描述了主機 (VS Code 擴充功能) 和 WebAssembly 程式碼之間的互動,促進了雙向通訊。在我們的範例中,此功能允許 WebAssembly 程式碼記錄其活動的追蹤。為了啟用此功能,我們修改 WIT 檔案如下
world calculator {

	/// ....

	/// A log function implemented on the host side.
	import log: func(msg: string);

	/// ...
}
在 Rust 端,我們現在可以呼叫記錄函數
fn calc(op: Operation) -> u32 {
	log(&format!("Starting calculation: {:?}", op));
	let result = match op {
		// ...
	};
	log(&format!("Finished calculation: {:?}", op));
	result
}
在 TypeScript 端,擴充功能開發人員唯一需要執行的動作是提供記錄函數的實作。然後,VS Code 元件模型會協助產生必要的繫結,這些繫結將作為匯入傳遞給 WebAssembly 執行個體。
export async function activate(context: vscode.ExtensionContext): Promise<void> {
  // ...

  // The channel for printing the log.
  const log = vscode.window.createOutputChannel('Calculator - Log', { log: true });
  context.subscriptions.push(log);

  // The implementation of the log function that is called from WASM
  const service: calculator.Imports = {
    log: (msg: string) => {
      log.info(msg);
    }
  };

  // Create the bindings to import the log function into the WASM module
  const imports = calculator._.imports.create(service, wasmContext);
  // Instantiate the module
  const instance = await WebAssembly.instantiate(module, imports);

  // ...
}
與第一個範例相比,WebAssembly.instantiate 呼叫現在包含 calculator._.imports.create(service, wasmContext) 的結果作為第二個引數。此 imports.create 呼叫會從服務實作產生低階 WASM 繫結。在最初的範例中,由於不需要匯入,因此我們傳遞了一個空的物件實值。這次,我們在偵錯工具下於 VS Code 桌面環境中執行擴充功能。感謝 Connor Peet 的出色工作,現在可以在 Rust 程式碼中設定中斷點,並使用 VS Code 偵錯工具逐步執行。
使用元件模型資源
WebAssembly 元件模型引入了資源的概念,它提供了一種標準化的機制來封裝和管理狀態。此狀態在呼叫邊界的其中一側 (例如,在 TypeScript 程式碼中) 管理,並在另一側 (例如,在 WebAssembly 程式碼中) 存取和操作。資源廣泛用於 WASI 預覽版 0.2 API 中,其中檔案描述項是一個典型的範例。在此設定中,狀態由擴充功能主機管理,並由 WebAssembly 程式碼存取和操作。
資源也可以在相反的方向上運作,其狀態由 WebAssembly 程式碼管理,並由擴充功能程式碼存取和操作。這種方法對於 VS Code 在 WebAssembly 中實作具狀態服務特別有利,然後從 TypeScript 端存取這些服務。在下面的範例中,我們定義了一個資源,該資源實作一個計算機,支援 逆波蘭表示法,類似於 惠普手持計算機中使用的那些表示法。
// wit/calculator.wit
package vscode:example;

interface types {

	enum operation {
		add,
		sub,
		mul,
		div
	}

	resource engine {
		constructor();
		push-operand: func(operand: u32);
		push-operation: func(operation: operation);
		execute: func() -> u32;
	}
}
world calculator {
	export types;
}
以下是 Rust 中計算機資源的簡單實作
impl EngineImpl {
	fn new() -> Self {
		EngineImpl {
			left: None,
			right: None,
		}
	}

	fn push_operand(&mut self, operand: u32) {
		if self.left == None {
			self.left = Some(operand);
		} else {
			self.right = Some(operand);
		}
	}

	fn push_operation(&mut self, operation: Operation) {
        let left = self.left.unwrap();
        let right = self.right.unwrap();
        self.left = Some(match operation {
			Operation::Add => left + right,
			Operation::Sub => left - right,
			Operation::Mul => left * right,
			Operation::Div => left / right,
		});
	}

	fn execute(&mut self) -> u32 {
		self.left.unwrap()
	}
}
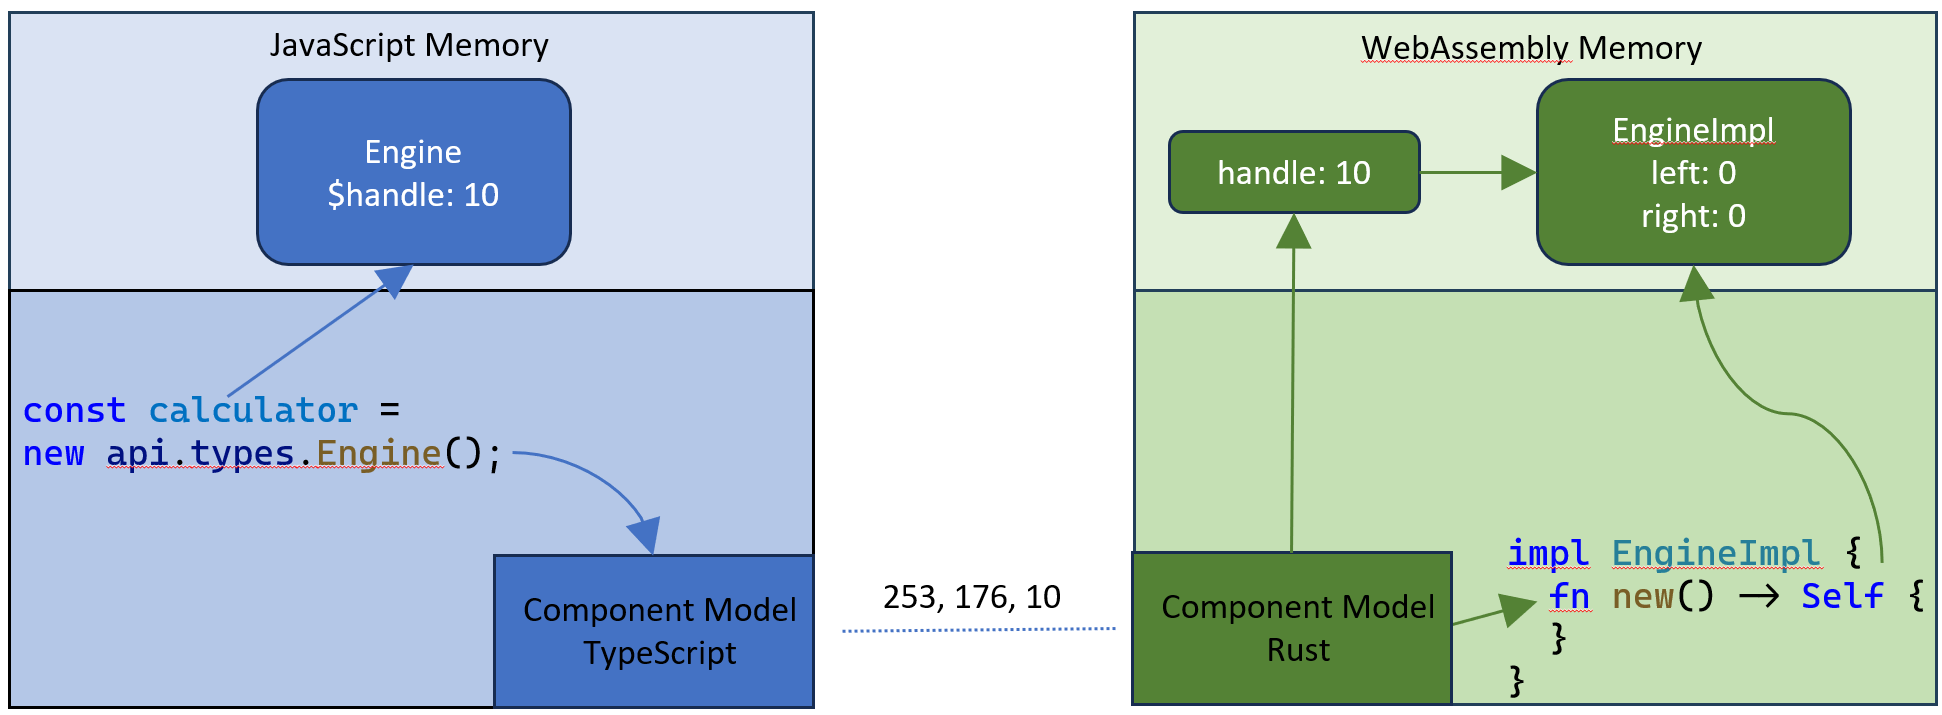
在 TypeScript 程式碼中,我們以與之前相同的方式繫結匯出。唯一的區別是,繫結過程現在為我們提供了一個代理類別,用於在 WebAssembly 程式碼中例項化和管理 calculator 資源。
// Bind the JavaScript Api
const api = calculator._.exports.bind(
  instance.exports as calculator._.Exports,
  wasmContext
);

context.subscriptions.push(
  vscode.commands.registerCommand('vscode-samples.wasm-component-model.run', () => {
    channel.show();
    channel.appendLine('Running calculator example');

    // Create a new calculator engine
    const calculator = new api.types.Engine();

    // Push some operands and operations
    calculator.pushOperand(10);
    calculator.pushOperand(20);
    calculator.pushOperation(Types.Operation.add);
    calculator.pushOperand(2);
    calculator.pushOperation(Types.Operation.mul);

    // Calculate the result
    const result = calculator.execute();
    channel.appendLine(`Result: ${result}`);
  })
);
當您執行對應的命令時,它會將 Result: 60 列印到輸出通道。如前所述,資源的狀態位於呼叫邊界的其中一側,並使用控制代碼從另一側存取。除了傳遞給與資源互動的方法的引數之外,不會發生資料複製。
此範例的完整原始碼可在 VS Code 擴充功能範例儲存庫中找到。
直接從 Rust 使用 VS Code API
元件模型資源可以用於封裝和管理跨 WebAssembly 元件和主機的狀態。此功能使我們能夠利用資源將 VS Code API 以標準方式公開到 WebAssembly 程式碼中。這種方法的優點在於,整個擴充功能可以用編譯為 WebAssembly 的語言撰寫。我們已開始探索這種方法,以下是以 Rust 撰寫的擴充功能的原始碼
use std::rc::Rc;

#[export_name = "activate"]
pub fn activate() -> vscode::Disposables {
	let mut disposables: vscode::Disposables = vscode::Disposables::new();

	// Create an output channel.
	let channel: Rc<vscode::OutputChannel> = Rc::new(vscode::window::create_output_channel("Rust Extension", Some("plaintext")));

	// Register a command handler
	let channel_clone = channel.clone();
	disposables.push(vscode::commands::register_command("testbed-component-model-vscode.run", move || {
		channel_clone.append_line("Open documents");

		// Print the URI of all open documents
		for document in vscode::workspace::text_documents() {
			channel.append_line(&format!("Document: {}", document.uri()));
		}
	}));
	return disposables;
}

#[export_name = "deactivate"]
pub fn deactivate() {
}
請注意,此程式碼類似於以 TypeScript 撰寫的擴充功能。
雖然此探索看起來很有希望,但我們已決定暫時不繼續進行。主要原因是 WASM 中缺乏非同步支援。許多 VS Code API 都是非同步的,因此很難直接代理到 WebAssembly 程式碼中。我們可以將 WebAssembly 程式碼在單獨的 Worker 中執行,並採用與 WASI Preview 1 支援中使用的相同同步機制,在 WebAssembly Worker 和擴充功能主機 Worker 之間進行同步。但是,這種方法可能會在同步 API 呼叫期間導致意外行為,因為這些呼叫實際上是非同步執行的。因此,可觀察的狀態可能會在兩個同步呼叫之間發生變化 (例如,setX(5); getX(); 可能不會傳回 5)。
此外,正在努力將完整的非同步支援引入 0.3 預覽版時間範圍內的 WASI。Luke Wagner 在 WASM I/O 2024 上提供了有關非同步支援目前狀態的更新。我們已決定等待此支援,因為它將實現更完整和更簡潔的實作。
如果您對對應的 WIT 檔案、Rust 程式碼和 TypeScript 程式碼感興趣,可以在 vscode-wasm 儲存庫的 rust-api 資料夾中找到它們。
接下來的發展
我們目前正在準備一篇後續部落格文章,其中將涵蓋更多可以使用 WebAssembly 程式碼進行擴充功能開發的領域。主要主題將包括
- 以 WebAssembly 撰寫 語言伺服器。
- 使用產生的元模型將長時間執行的 WebAssembly 程式碼透明地卸載到單獨的 Worker 中。
隨著 VS Code 慣用的元件模型實作到位,我們將繼續努力為 VS Code 實作 WASI 0.2 預覽版。
謝謝,
Dirk 和 VS Code 團隊
Happy Coding!