情境即一切:透過自訂指示獲得更佳的 AI 成果
2025 年 3 月 26 日,作者:Rob Conery,@robconery.com,Burke Holland,@burkeholland
本月初,我們宣布 Visual Studio Code 中的自訂指示正式推出。自訂指示讓您能為 Copilot 提供關於您團隊工作流程、您的特定風格偏好、模型可能不熟悉的程式庫等特定情境。
在這篇文章中,我們將深入探討自訂指示是什麼、您今天如何使用它們來大幅改善 GitHub Copilot 的成果,甚至還有一個稱為「提示檔案」的全新預覽功能,您今天就可以試用。
更精簡的提示,透過簡單的 Markdown 檔案獲得更佳成果
使用 GitHub Copilot 可以大幅提升您的開發流程,但在有效提示方面,確實存在學習曲線。可能需要嘗試幾次才能獲得您想要的正確答案,這通常意味著需要重新措辭您的問題或提示。即便如此,Copilot 仍能加速您的工作流程!
但您知道您可以「調整」GitHub Copilot,使其更符合您的需求嗎?透過使用簡單的 Markdown 檔案,您可以為 Copilot 提供特定的指示,幫助它更好地理解您的專案。在這篇文章中,我們將引導您完成建立和使用自訂指示的流程,這是 VS Code 中新發布的功能。
試試看:在您的專案中建立一個名為 .github/copilot-instructions.md 的檔案。此檔案將包含幫助 Copilot 更好地理解您的專案的指示。Copilot 會自動偵測到它,因此您無需執行任何特殊操作即可使其運作。
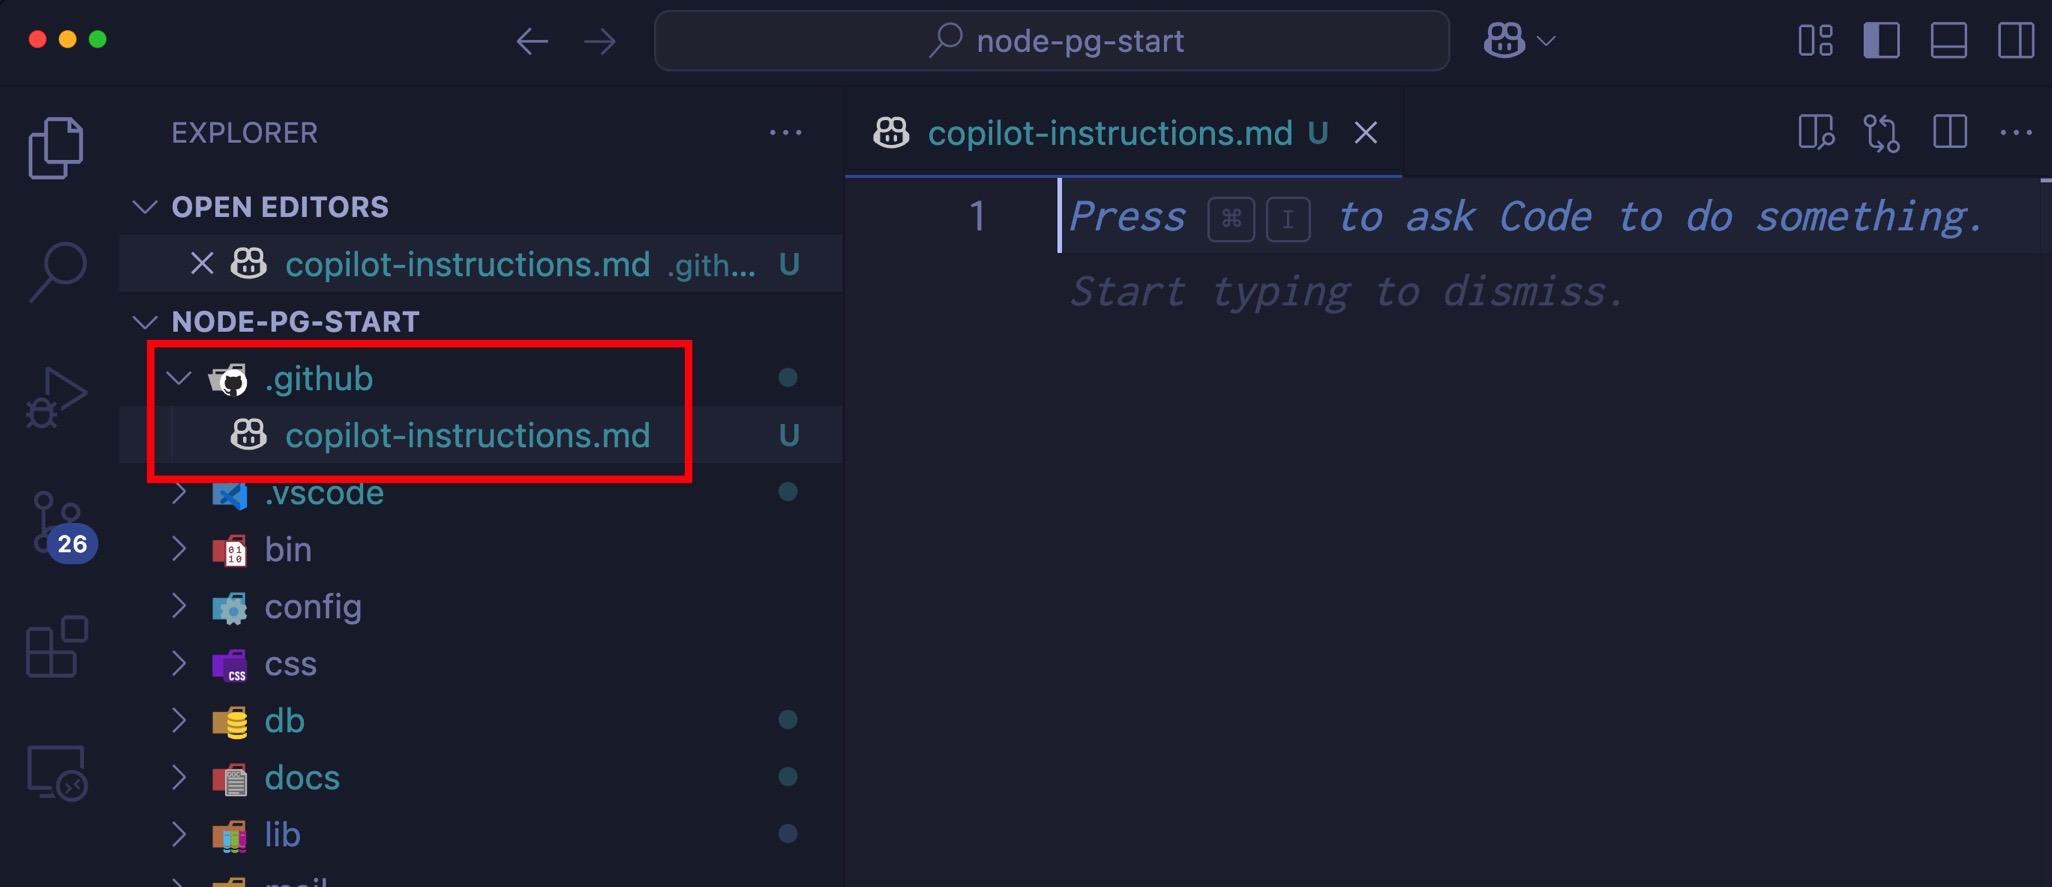
將這些指示新增至檔案中
# Copilot Instructions

This project is a web application that allows users to create and manage tasks. The application is built using React and Node.js, and it uses MongoDB as the database.

## Coding Standards

- Use camelCase for variable and function names.
- Use PascalCase for component names.
- Use single quotes for strings.
- Use 2 spaces for indentation.
- Use arrow functions for callbacks.
- Use async/await for asynchronous code.
- Use const for constants and let for variables that will be reassigned.
- Use destructuring for objects and arrays.
- Use template literals for strings that contain variables.
- Use the latest JavaScript features (ES6+) where possible.
標題並非絕對必要,但有助於闡明檔案的用途。其餘內容是一組指示,可幫助 Copilot 更好地理解您的專案。您可以自訂這些指示以符合您專案的需求。
現在,開啟「聊天」檢視,並使用非常簡潔的命令提示它,例如 tail recursion。您不必問「如何在 JavaScript 中執行尾遞迴」或類似的問題。只需輸入 tail recursion 並按下 Enter。請注意,Copilot 了解您的專案情境,並為您提供相關的答案。
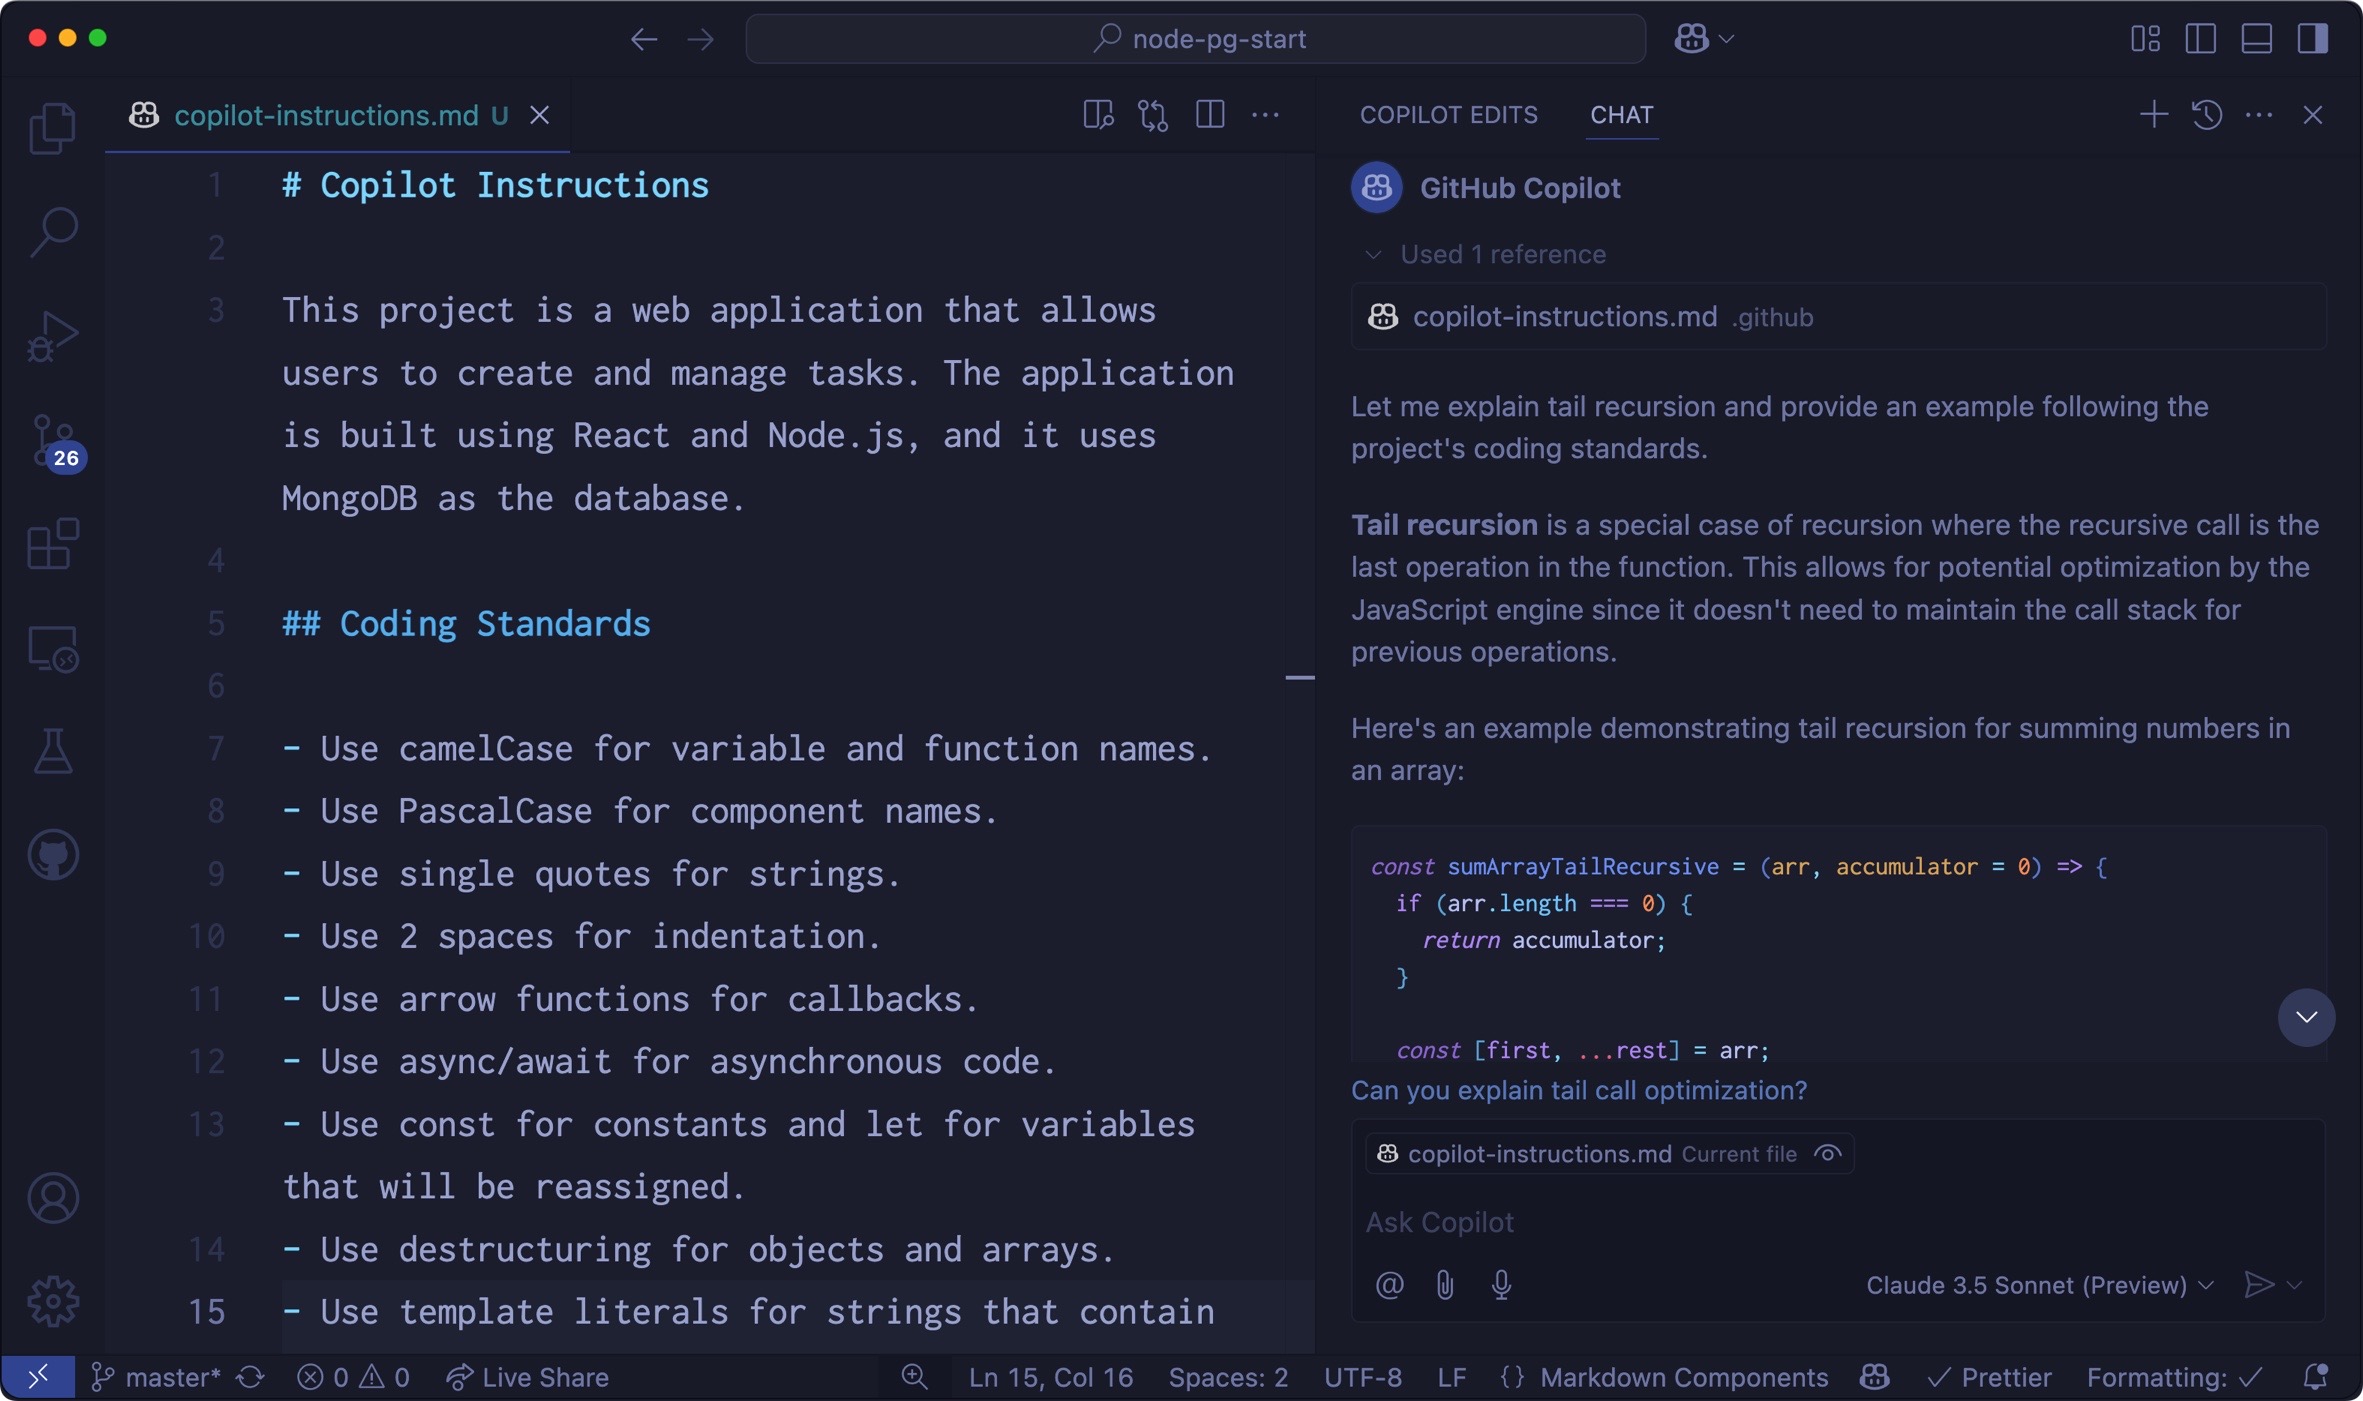
請注意,即使您使用了更精簡的提示,Copilot 仍然以您期望的格式 (2 個空格、camelCase 等) 給您更詳細的答案。
這就是使用自訂指示的威力!但您還可以做更多的事情...
自訂所有事物!
GitHub Copilot 為 VS Code 新增了許多強大的功能,包括產生您的提交訊息、檢閱選取的程式碼,甚至產生測試!
這些都很有用,但您可能已經有自己處理這些事情的方式。好消息是,您可以透過覆寫工作區中的一些設定來個人化它們。
試試看:開啟命令選 palette (⇧⌘P (Windows, Linux Ctrl+Shift+P)) 並輸入詞語「workspace settings」。您應該會看到一個選單選項,顯示喜好設定:開啟工作區設定 (JSON)。選取該選項,並將以下設定新增至您的工作區
{
"github.copilot.chat.commitMessageGeneration.instructions": [
{
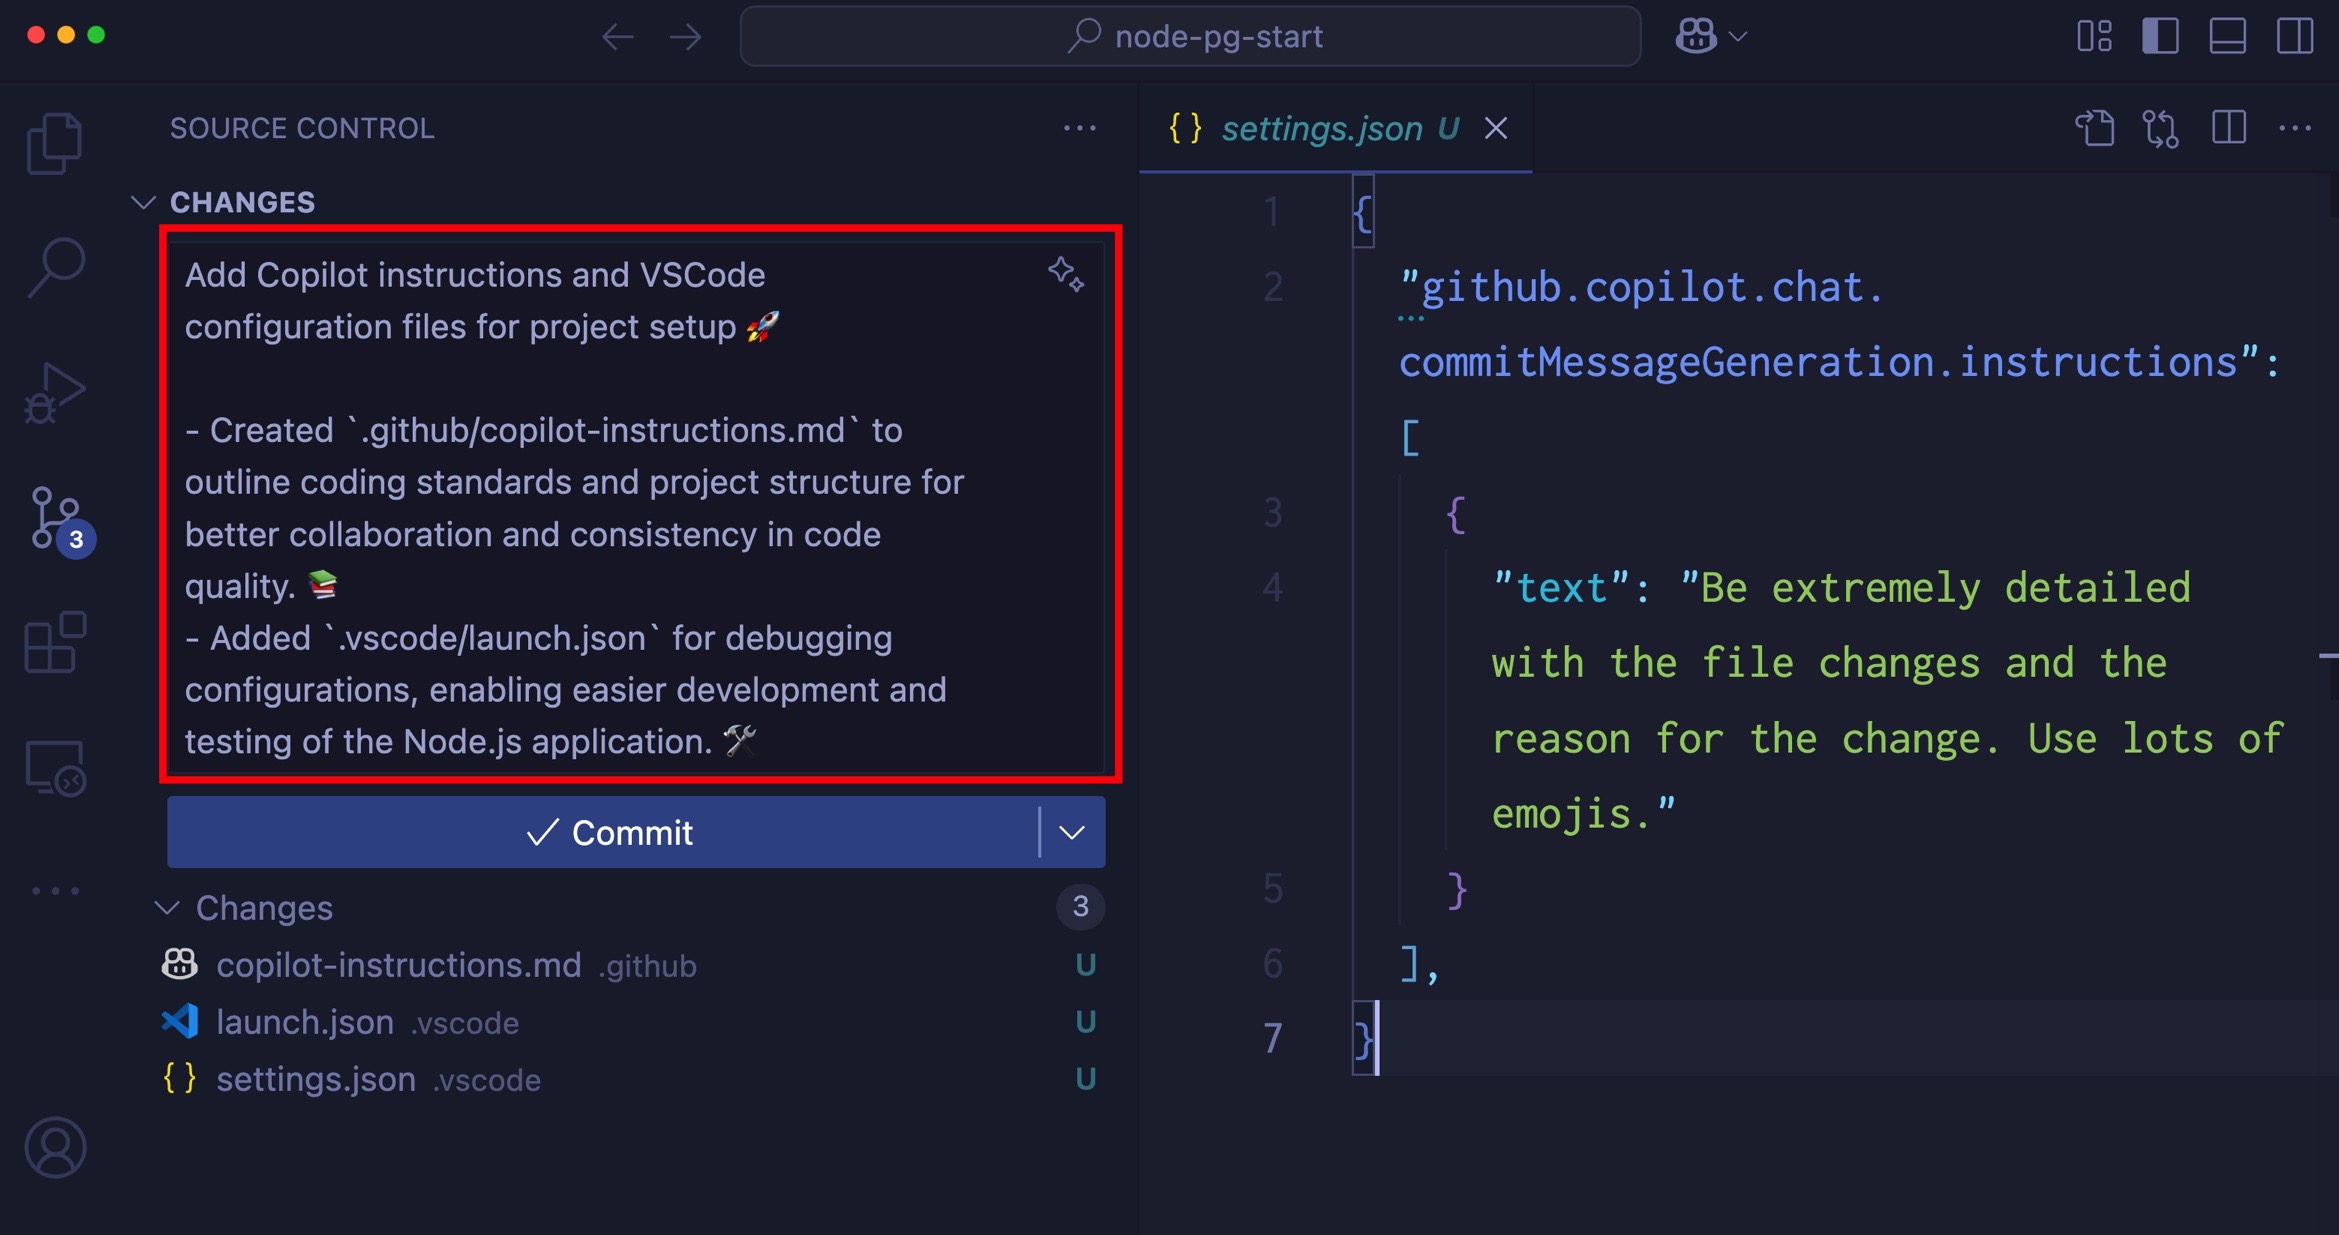
"text": "Be extremely detailed with the file changes and the reason for the change. Use lots of emojis."
}
]
}
儲存 settings.json 檔案並關閉它。活動列中的「原始碼控制」圖示現在應該會指示您已變更檔案。如果您在沒有 Git 存放庫的測試目錄中工作,您可以直接透過「原始碼控制」檢視建立一個。只需選取初始化存放庫按鈕並依照指示操作即可。
有趣的地方來了:開啟「原始碼控制」檢視,並在提交訊息輸入欄位中選取閃爍圖示。這會指示 Copilot 為您產生提交訊息。請注意,它產生的提交訊息非常詳細,並使用了許多表情符號!
將 settings.json 檔案中的指示註解掉,然後再次產生提交訊息。您應該會看到一個較不詳細且未使用任何表情符號的提交訊息。
撰寫良好、詳細的提交訊息是一項需要時間學習的技能。但有了 Copilot,您可以節省大量時間,並獲得更好的訊息。
全力投入自訂指示
您可能將您的程式碼標準放在不同的檔案中,並使用 Markdown 以外的不同格式。也許您有一個用於 JavaScript、一個用於 Python,還有一個用於 Go。您也可能對如何使用資料庫有標準 - 您使用的資料類型、命名慣例、連線字串處理等等。
您不必將所有這些合併到一個檔案中。您可以將它們分開,仍然可以使用 Copilot 來協助您處理所有這些!
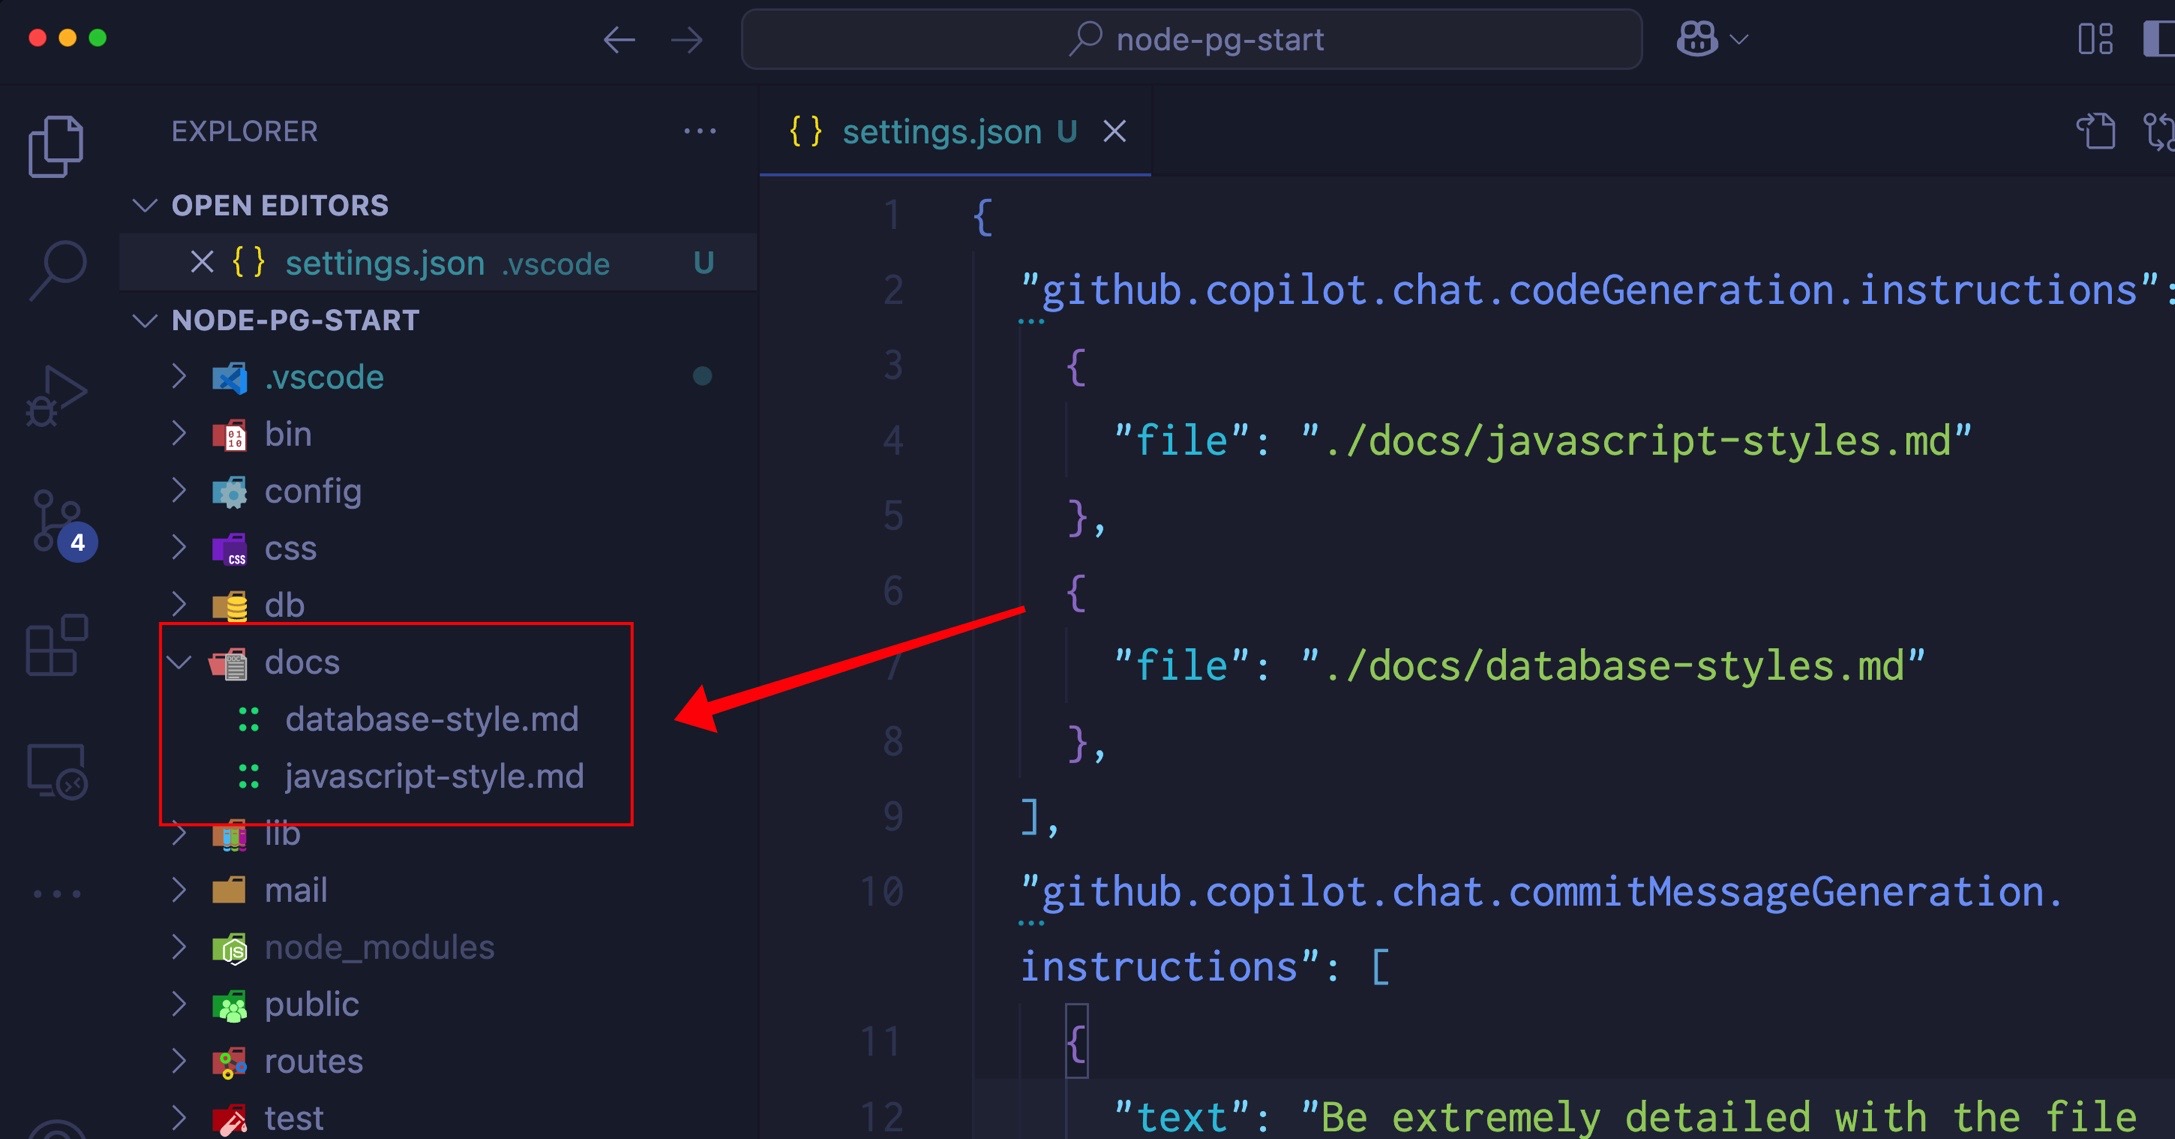
讓我們試試看!開啟您的 .vscode/settings.json 檔案 (工作區設定) 並新增以下設定
{
  "github.copilot.chat.codeGeneration.instructions": [
    {
      "file": "./docs/javascript-styles.md"
    },
    {
      "file": "./docs/database-styles.md"
    }
  ]
}
這是在指示 Copilot 在 docs 目錄中尋找兩個檔案:javascript-styles.md 和 database-styles.md。您可以新增任意數量的檔案,Copilot 將按照您指定的順序尋找它們。
您可以在這裡新增任何您喜歡的檔案,包括您目前衝刺的規格。我們甚至看到有人將 Gherkin 規格新增為自訂指示!
試試看!
變更模型語氣
模型往往過於客氣。它們經常道歉,而且如果您告訴它們某件事是錯誤的,它們幾乎從不為自己和它們所做的決定辯護。當您嘗試完成工作時,這可能會很煩人。您可以使用一些關於您希望模型如何回應的指示,來覆寫模型過於樂於助人的語氣。
- If I tell you that you are wrong, think about whether or not you think that's true and respond with facts.
- Avoid apologizing or making conciliatory statements.
- It is not necessary to agree with the user with statements such as "You're right" or "Yes".
- Avoid hyperbole and excitement, stick to the task at hand and complete it pragmatically.
務必始終以肯定而非否定的方式給予模型指示,因為它們需要知道該做什麼,而不是不該做什麼。您可以說「避免」,而不是說「不要做」。
實驗並享受樂趣!一位程式設計師回報說,他們喜歡透過以俳句形式產生測試來活絡他們的測試套件。這似乎有點極端,但如果您正在進行一個業餘專案,何樂而不為呢?您可以新增如下指示
- Generate tests in haiku format.
- Use 5-7-5 syllable structure.
- Use nature themes and imagery.
還有一件事...
GitHub Copilot 也可以將程式碼檔案理解為自訂指示!例如,如果您有一個 SQL 檔案,您可以將其新增到您的設定中,Copilot 將使用它來幫助產生您的資料存取程式碼。
如果您有特別喜歡的資料存取工具,您可以將範例新增到您的專案中,Copilot 將在產生資料存取程式碼時使用它。
試試看!以下是我們團隊成員用於為 PostgreSQL 資料庫產生 Sequelize 模型 (Node.js ORM) 的範例
//Template for a Sequelize model
const { DataTypes, Model } = require('sequelize');
class User extends Model {
  //static or factory methods
  //instance methods
}
const init = function(sequelize){
  User.init({
    //schema goes here
  }, {
    hooks: {},
    tableName: "users"
    underscored: true,
    sequelize
  })
}

exports.createUser = function(sequelize){
  init(sequelize);
  return User;
}
在您的設定中參考此檔案,GitHub Copilot 將使用此範本以及您的 SQL 檔案,為您在專案中產生模型。您可以在「編輯」或「詢問」模式下執行此操作。只需使用提示 generate the data access for the project,然後砰!魔法!
介紹提示檔案
提示檔案允許您為自己和您的團隊撰寫可重複使用的提示。這有助於加強一致性,同時減少提示,而提示可能會變得繁瑣。
例如,假設您想要建立一個可重複使用的提示,該提示將根據資料庫結構描述建立介面。您可以建立一個包含資料庫結構描述的提示檔案。Copilot 非常樂意為您產生 SQL 指令碼來執行此操作。
提示檔案位於 .github/prompts 目錄中,並且只是 Markdown 檔案,名稱格式為 *.prompt.md。
您可能有一個 .github/prompts/database_users.prompt.md,其中包含您的資料庫描述。例如
# User Authentication

Our application will have `users` with the following information:

- The standard user information, including: `name`, `email` (unique).
- A link for a "magic" login, which will be a `GUID` as well as the expiration date for the link.
- Social login account IDs for Microsoft, GitHub, and Google.
- The timestamp of the last login.
- The timestamp for when the user was created.
然後,您可以建立另一個名為 generate-interface.prompt.md 的提示檔案,其中包含產生介面的指示。提示檔案可以互相參考,因此您可以透過簡單的 Markdown 連結將資料庫結構描述傳遞到此提示檔案中。
Generate a TypeScript interface for the table specified by the user. Refer to the [user schema](database_users.prompt.md).
若要在聊天中使用這些提示檔案,請使用附加按鈕 (迴紋針) 或使用 ⌥⌘/ (Windows, Linux Ctrl+Alt+/)。從選單中選取提示,然後選取您要使用的提示檔案。請注意,當我使用 generate-interface.prompt.md 檔案時,它會自動拉入 database_users.prompt.md 檔案。

結論
VS Code 是一個可自訂的助手,如果配置得當,它可以成為團隊工作流程不可或缺的一部分。有了自訂指示,控制權就掌握在開發人員手中。
祝您編碼愉快!