Dev Container CLI
本主題涵蓋開發容器命令列介面 (dev container CLI),可讓您建置和管理開發容器,並且是開發容器規格的配套工具。
開發容器
一致且可預測的環境是生產力高且愉快的軟體開發體驗的關鍵。
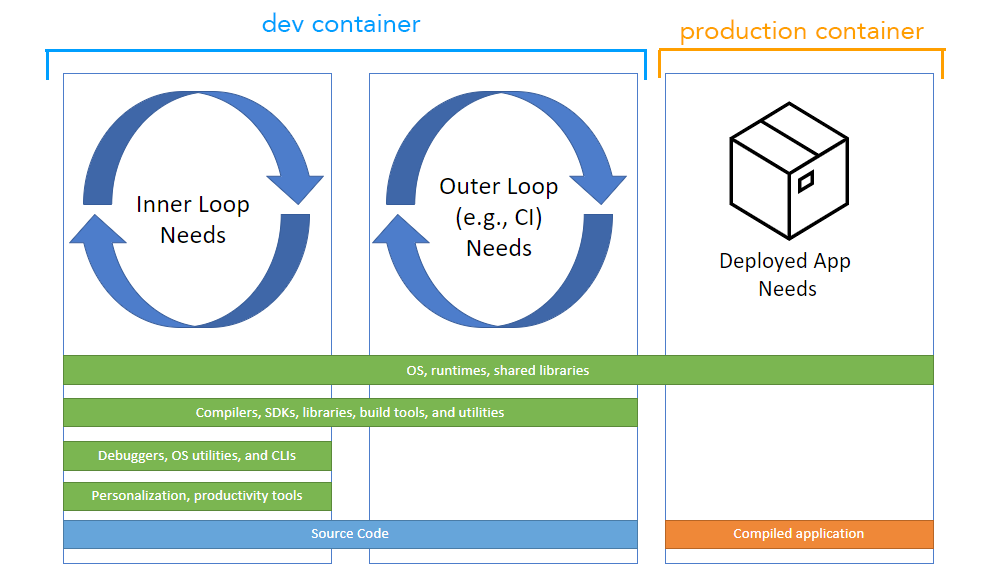
容器 (例如 Docker 容器) 過去一直用於標準化部署的應用程式,但現在有絕佳的機會來支援其他案例,包括持續整合 (CI)、測試自動化和功能完整的程式碼撰寫環境。開發容器提供此工作環境,並確保您的專案擁有所需的工具和軟體,無論專案複雜、分散式,或僅有一些需求。

Visual Studio Code 透過 Dev Containers 擴充功能和 GitHub Codespaces 支援開發容器。此支援由 devcontainer.json 提供後盾,這是一種結構化 JSON with Comments (jsonc) 中繼資料格式,用於設定容器化環境。
隨著容器化生產工作負載變得司空見慣,開發容器已廣泛適用於 VS Code 以外的案例。為了在任何環境中推廣開發容器,已開始制定開發容器規格,讓任何工具中的任何人都能設定一致的開發環境。開放原始碼 dev container CLI 作為規格的參考實作。
dev container CLI
當 VS Code 和 Codespaces 等工具在使用者的專案中偵測到 devcontainer.json 檔案時,它們會使用 CLI 來設定開發容器。dev container CLI 是參考實作,因此個別使用者和其他工具可以讀取 devcontainer.json 中繼資料並從中建立開發容器。
此 CLI 可以直接使用,也可以整合到產品體驗中,類似於今天與 Dev Containers 和 Codespaces 的整合方式。它目前同時支援簡單的單一容器選項,並與 Docker Compose 整合以用於多容器案例。
CLI 可在 devcontainers/cli 存放庫中取得。
安裝
您可以透過 Dev Containers 擴充功能快速試用 CLI。從 [命令選擇區] (F1) 選取 Dev Containers: 安裝 devcontainer CLI 命令。
其他安裝方式
還有其他選項可在其他地方使用 CLI
- 安裝其 npm 套件
- 使用 GitHub Action 或 Azure DevOps Task
- 您可以在 devcontainers/ci 中找到這些項目
- 從來源建置 CLI 存放庫
- 您可以在 CLI 存放庫的 README 中深入了解從來源建置
在本頁中,我們將重點介紹如何使用 npm 套件。
npm install
若要安裝 npm 套件,您需要安裝 Python、Node.js (版本 14 或更高版本) 和 C/C++,才能建置其中一個相依性。VS Code 如何貢獻 wiki 包含有關建議工具組的詳細資訊。
npm install -g @devcontainers/cli
確認您可以執行 CLI 並查看其說明文字
devcontainer <command>

Commands:
  devcontainer up                   Create and run dev container
  devcontainer build [path]         Build a dev container image
  devcontainer run-user-commands    Run user commands
  devcontainer read-configuration   Read configuration
  devcontainer features             Features commands
  devcontainer templates            Templates commands
  devcontainer exec <cmd> [args..]  Execute a command on a running dev container

Options:
  --help     Show help                                                 [boolean]
  --version  Show version number                                       [boolean]
注意: 如果您透過 VS Code 安裝 CLI,則會列出開啟開發容器的
open命令。
執行 CLI
取得 CLI 後,您可以透過範例專案 (例如此 Rust 範例) 試用。
將 Rust 範例複製到您的電腦,並使用 CLI 的 up 命令啟動開發容器
git clone https://github.com/microsoft/vscode-remote-try-rust
devcontainer up --workspace-folder <path-to-vscode-remote-try-rust>
這會從容器登錄檔下載容器映像,並啟動容器。您的 Rust 容器現在應該正在執行中
[88 ms] dev-containers-cli 0.1.0.
[165 ms] Start: Run: docker build -f /home/node/vscode-remote-try-rust/.devcontainer/Dockerfile -t vsc-vscode-remote-try-rust-89420ad7399ba74f55921e49cc3ecfd2 --build-arg VARIANT=bullseye /home/node/vscode-remote-try-rust/.devcontainer
[+] Building 0.5s (5/5) FINISHED
 => [internal] load build definition from Dockerfile                       0.0s
 => => transferring dockerfile: 38B                                        0.0s
 => [internal] load .dockerignore                                          0.0s
 => => transferring context: 2B                                            0.0s
 => [internal] load metadata for mcr.microsoft.com/vscode/devcontainers/r  0.4s
 => CACHED [1/1] FROM mcr.microsoft.com/vscode/devcontainers/rust:1-bulls  0.0s
 => exporting to image                                                     0.0s
 => => exporting layers                                                    0.0s
 => => writing image sha256:39873ccb81e6fb613975e11e37438eee1d49c963a436d  0.0s
 => => naming to docker.io/library/vsc-vscode-remote-try-rust-89420ad7399  0.0s
[1640 ms] Start: Run: docker run --sig-proxy=false -a STDOUT -a STDERR --mount type=bind,source=/home/node/vscode-remote-try-rust,target=/workspaces/vscode-remote-try-rust -l devcontainer.local_folder=/home/node/vscode-remote-try-rust --cap-add=SYS_PTRACE --security-opt seccomp=unconfined --entrypoint /bin/sh vsc-vscode-remote-try-rust-89420ad7399ba74f55921e49cc3ecfd2-uid -c echo Container started
Container started
{"outcome":"success","containerId":"f0a055ff056c1c1bb99cc09930efbf3a0437c54d9b4644695aa23c1d57b4bd11","remoteUser":"vscode","remoteWorkspaceFolder":"/workspaces/vscode-remote-try-rust"}
然後您可以在此開發容器中執行命令
devcontainer exec --workspace-folder <path-to-vscode-remote-try-rust> cargo run
這會編譯並執行 Rust 範例,並輸出
[33 ms] dev-containers-cli 0.1.0.
   Compiling hello_remote_world v0.1.0 (/workspaces/vscode-remote-try-rust)
    Finished dev [unoptimized + debuginfo] target(s) in 1.06s
     Running `target/debug/hello_remote_world`
Hello, VS Code Dev Containers!
{"outcome":"success"}
CLI 存放庫的 README 中也提供了上述步驟。
自動化
如果您想要在 CI/CD 建置或測試自動化中使用 dev container CLI,您可以在 devcontainers/ci 存放庫中找到 GitHub Actions 和 Azure DevOps Tasks 的範例。
預先建置
devcontainer build 命令可讓您快速建置開發容器映像,步驟與 Dev Containers 擴充功能或 GitHub Codespaces 使用的步驟相同。當您想要使用 CI 或 DevOps 產品 (例如 GitHub Actions) 預先建置開發容器映像時,這特別有用。
build 接受包含 .devcontainer 資料夾或 .devcontainer.json 檔案之資料夾的路徑。例如,devcontainer build --workspace-folder <my_repo> 將會為 my_repo 建置容器映像。
建置和發佈映像的範例
例如,您可能想要預先建置許多映像,然後在多個專案或存放庫中重複使用這些映像。若要這麼做,請依照下列步驟執行
-
建立原始碼存放庫。
-
為您想要預先建置的每個映像建立開發容器組態,並視需要自訂 (包括 開發容器功能)。例如,請考慮此
devcontainer.json檔案{ "build": { "dockerfile": "Dockerfile" }, "features": { "ghcr.io/devcontainers/features/docker-in-docker:1": { "version": "latest" } } } -
使用
devcontainer build命令來建置映像,並將其 推送 至您的映像登錄檔。請參閱您的映像登錄檔 (例如 Azure Container Registry、GitHub Container Registry 或 Docker Hub) 的文件,以取得映像命名和額外步驟 (例如驗證) 的相關資訊。devcontainer build --workspace-folder <my_repo> --push true --image-name <my_image_name>:<optional_image_version>
避免使用 Docker 建置的映像發生問題
假設 Dockerfile 和 Docker Compose 檔案可以在沒有 VS Code 或 devcontainer CLI 的情況下使用,您可能會想要讓使用者知道他們不應該嘗試直接建置映像。您可以在進階開發容器文件中深入了解。
範本與功能
您可以使用 dev container CLI 來使用開發容器範本和功能。當您建立和使用範本時,您可能會想要為其他人發佈這些範本,您可以在開發容器規格中深入了解。
意見反應
dev container CLI 和規格正在積極開發中,我們歡迎您的意見反應,您可以在此問題中提供意見反應,或透過 devcontainers/cli 存放庫中的新問題和提取要求提供。
後續步驟
- Dev container specification repository - 閱讀並貢獻開放規格。
- devcontainer.json 參考 - 檢閱
devcontainer.json結構描述。 - 建立開發容器 - 為您的工作環境建立自訂容器。
- 進階容器 - 尋找進階容器案例的解決方案。